If your business isn’t online, it lacks visibility. As the digital audience grows, a strong online presence is essential for every business.
With over 3.07 billion monthly active users on Facebook as of 2026 (Statista), the platform offers unparalleled marketing opportunities for businesses to reach new customers. Whether you are a small local shop or a large corporation, a Facebook Business Page or a business account on Facebook helps you connect with your audience and drive sales.
To start, you’ll need to create a public Facebook business page or create a Facebook page for business.
This guide shows how to create a Facebook business page, how to create a Facebook page 2026, and simple digital marketing steps to boost reach for your online business.
Facebook Pages vs. Profiles
Personal profiles differ from business pages. A personal profile is for individual use, while a Facebook Business Page is made for businesses and organizations. Setting up Facebook for business gives access to insights, ads, Facebook business tools, and customer interaction not found in personal accounts.
A Facebook Business Page builds trust, since customers rely on official pages more than personal profiles used for promotions. It also supports multiple admins for content publishing, replying to messages, and posting on Facebook for businesses without sharing private login details.
Tip: Add customized branding like logos and colors when creating a professional Facebook page. These touches strengthen brand identity and audience recognition.
Facebook Business Page Types
When creating a Facebook business page, you can pick between two main types:
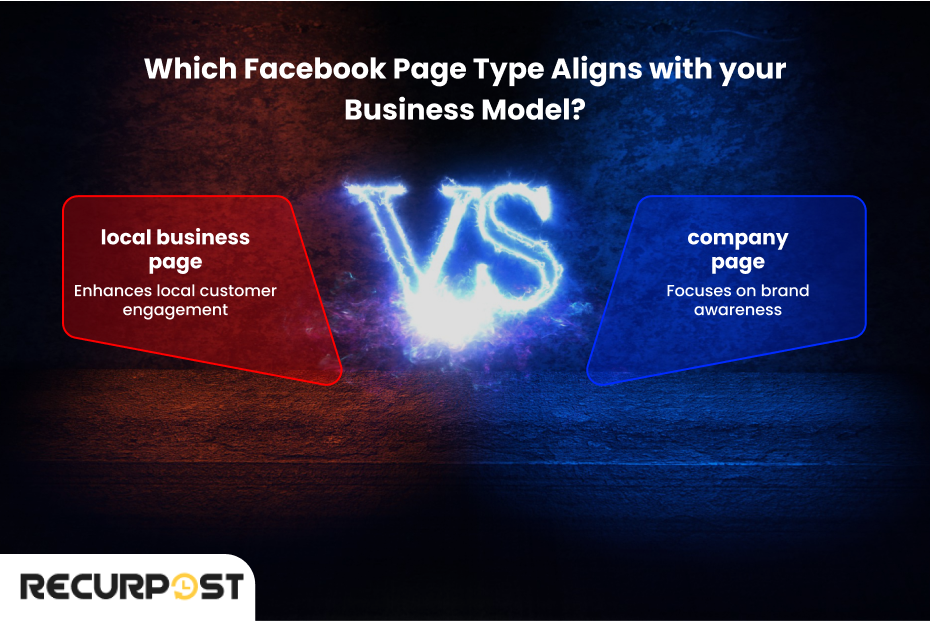
- Local Business Facebook Page: Best for stores, cafes, or service providers with a physical location. This page displays hours, directions, and reviews so local buyers can find you.
- Company Facebook Page: Works best for brands that sell online or reach wide audiences. This type supports creating a professional Facebook page that builds awareness outside a local area.
Choosing the right type shapes how customers engage with your brand. Understanding the difference between a local business Facebook page and a company profile helps you pick the right setup.
Local pages benefit from features like check-ins, reviews, and Facebook business listing tools that boost local search. Select the option that supports your Facebook for business setup.
Preparing to Create Your Facebook Business Page
Gather Necessary Information
Gather all necessary information for a smooth setup. Here’s what you need:
- Business Name: Use your official name or a recognizable name that customers can search. Keep this uniform across platforms to support social media page setup.
- Logo: A high-quality image that represents your brand. Since logos form first impressions, use one that is professional and clear.
- Description: Write a short bio of your business (up to 255 characters). Include relevant keywords naturally in your description to help customers find you. This helps explain your value.
- Contact Details: Include an email, phone number, website, and address when needed. Listing many contact options builds trust and fits Facebook business page creation requirements 2026.”
Create a Facebook Business Page: Step-by-Step Guide
Step 1: Log in to Your Personal Account
To manage a page, you first need a personal Facebook account. You cannot create a Facebook business page without a personal profile. If you don’t have one, set up a Facebook account for business first. This rule keeps accountability, since every page must link to an individual.
Your private details stay hidden unless you share them. The account works only as an admin tool for your Facebook business account creation and management process.
Step 2: Start the Page Creation Process
Go to the “Pages” menu and select Create > Page to begin. This will open the page setup interface, where you enter your business details.
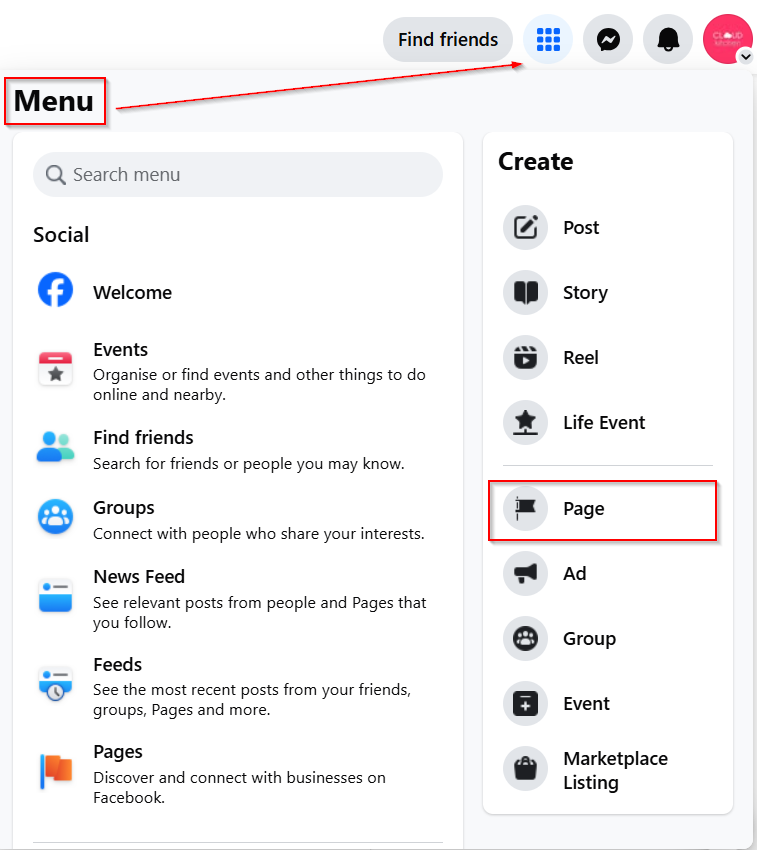
Take care to keep entries correct for credibility. Prompts guide you while setting up Facebook for business quickly and smoothly.
Step 3: Enter Your Business Information
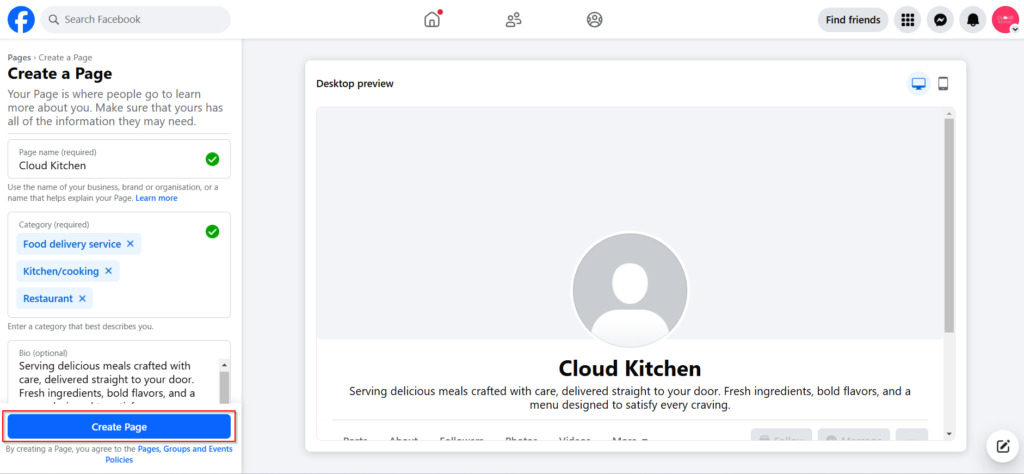
- Page Name: Use your official business name or a close variation. Consistency across platforms helps customers search and recognize you.
- Category: Choose up to three accurate categories (e.g., “Retail,” “Cafe,” “Consulting”). Choosing well improves search visibility when users look for products on Facebook.
- Description: Write a short bio (up to 255 characters). Add terms like create Facebook page for business, Facebook business page categories list, or your niche for better reach.
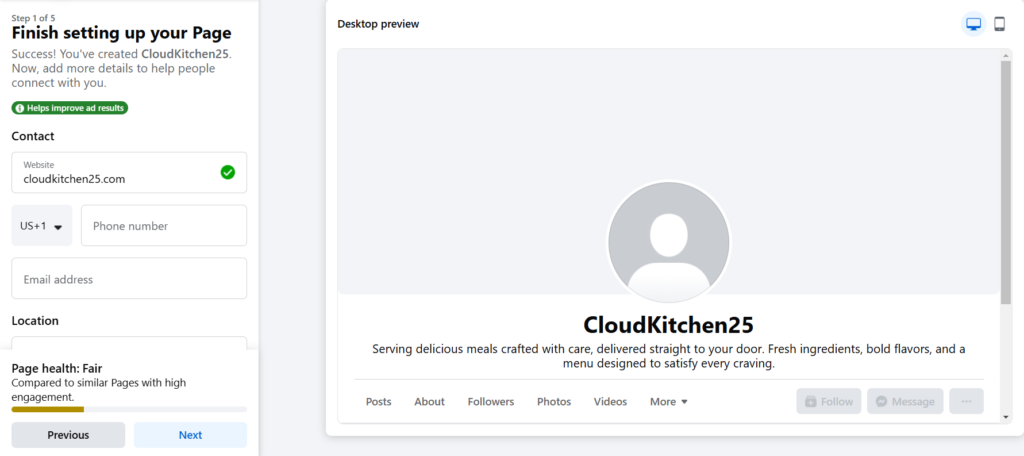
Step 4: Add Contact Details
- Website URL: Directs visitors to learn more about what you offer.
- Phone Number: Provides an immediate way for customers to reach out with questions or concerns.
- Email Address: Offers another channel for communication; consider using a professional email associated with your domain.
- Location: Listing an address helps local buyers, especially if you’re running a local business Facebook page.
- Hours of Operation: Share clear hours so customers know when you’re available. This matches Facebook page creation requirements 2026.
Step 5: Upload Profile and Cover Photos
Upload high-quality images for effective visual branding:
- Profile Photo: The recommended Facebook profile size is 170×170 pixels; typically, this would be your logo. Ensure it’s clear and recognizable even at smaller sizes.
- Cover Image: Size is 851×315 pixels, best for showing your identity or promotions. Use it to display your brand, website campaigns, new products, or events.
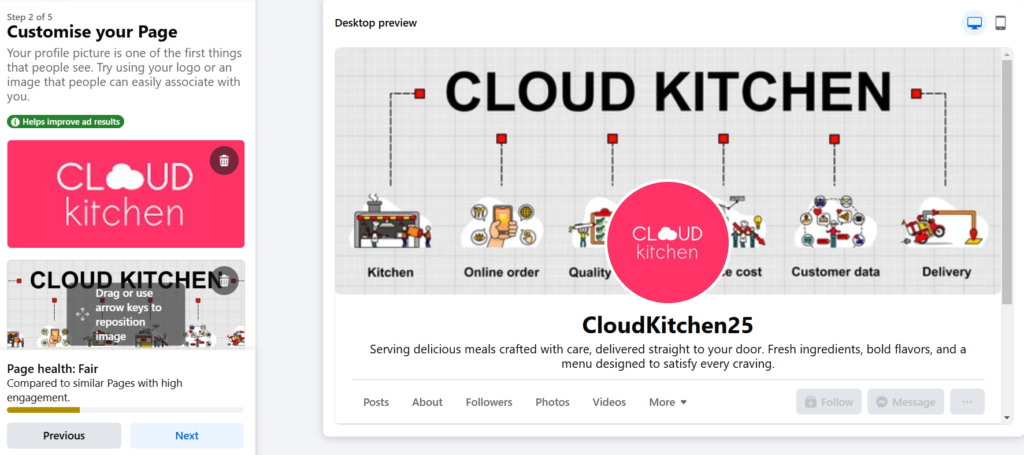
Consistent branding across platforms reinforces recognition among existing and potential customers.
Tip: Ensure high-quality visuals that align with your brand identity.
Step 6: Add an Action Button
Add a call-to-action button to enhance user engagement. Click Add Action Button > Enter Website URL > Save.
Options include:
- “Shop Now”: Directs users straight to an e-commerce section where they can make purchases.
- “Contact Us”: Encourages inquiries about products or services.
- “Learn More”: Links users directly to specific content or product pages on your website.
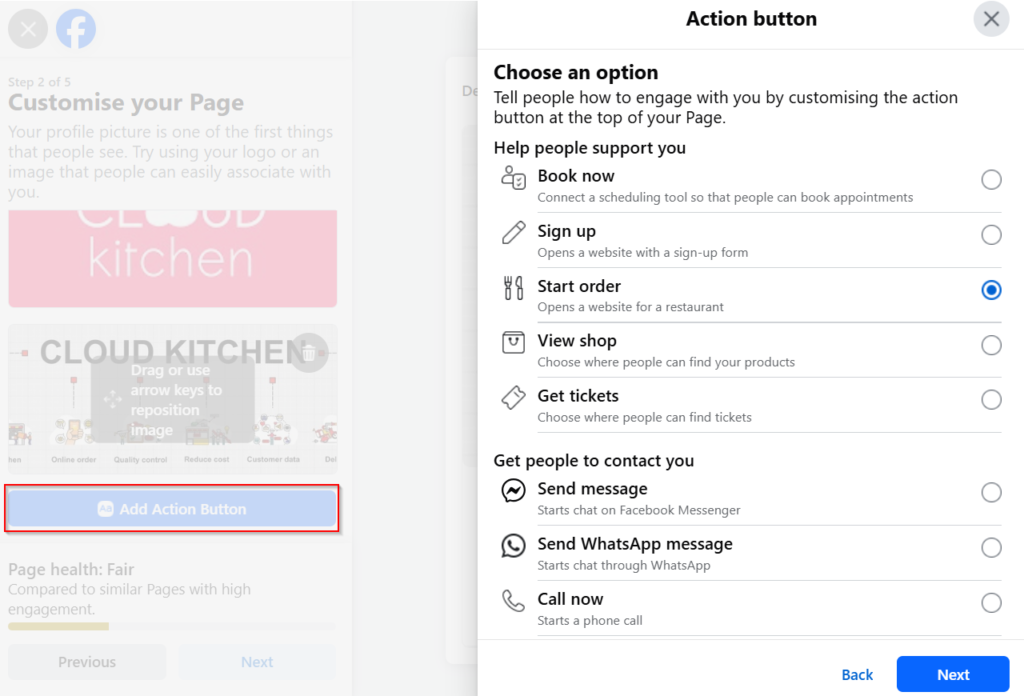
This top placement supports how to set up a Facebook page for a business by driving fast engagement. It’s a key part of the Facebook business page setup guide 2026.
Step 7: Integrate Communication Tools
Link tools like WhatsApp or Messenger. Both allow customers to ask questions or get support without leaving Facebook.
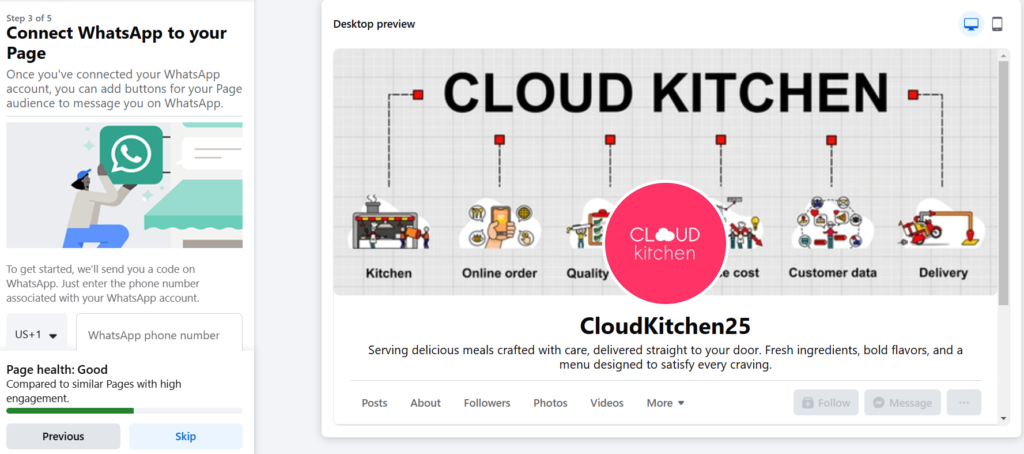
Fast replies increase conversions. Turn on alerts so no inquiry is missed during Facebook for business setup.
Step 8: Invite Friends and Customers
Invite friends and existing customers to like your new page to kickstart growth. This initial audience establishes credibility and attracts more followers.
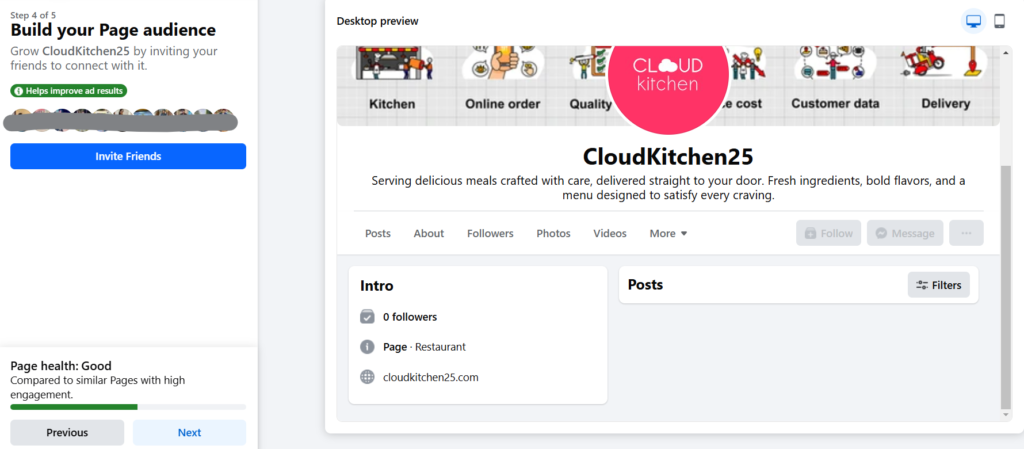
Encourage employees and loyal buyers to share your page within their networks. Send invites by email or share links on social media when creating a Facebook page for a business.
Step 9: Configure Notification Settings
Set notification preferences for page activity to stay updated on likes, comments, messages, and other interactions requiring your attention.
These settings control how frequently you receive alerts about new activity, preventing notification overload.
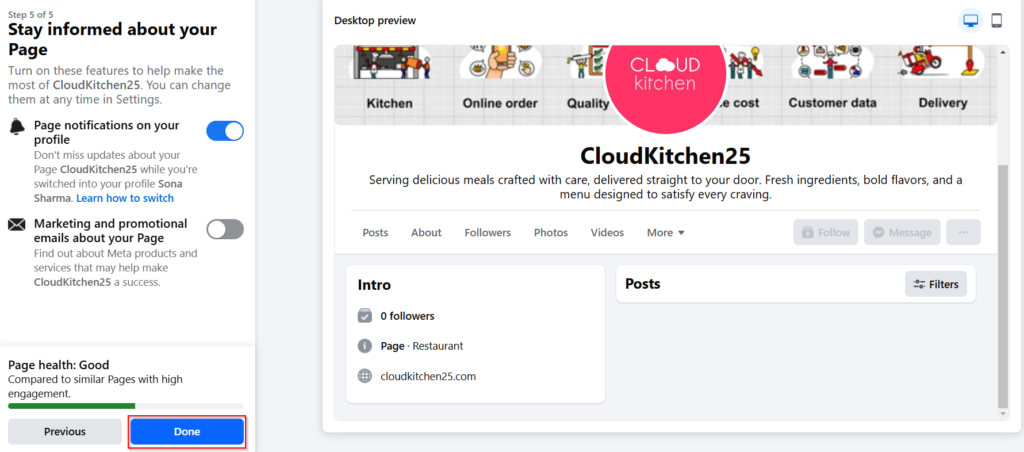
You can also choose “marketing and promotional emails about your page.” Once set, you’re ready. This fits the Facebook business sign-up steps.
Step 10: Start Posting Content
Your page is ready for content! Share text posts, Stories, Reels, photos, and polls. Post promotions, showcase products, and highlight customer testimonials. Keep in mind that the recommended Facebook image post size is 1,200 x 630 pixels, with an aspect ratio of 1.91:1.
Add a first post on your Facebook Business Page as an introduction. Post ideas include:
1. Business Introduction: Share who you are and what you offer. This sets the stage for future interactions.
“Welcome to [Your Business Name]!“
2. Showcase Product Features: Highlight unique aspects of your products. This educates potential buyers about what makes them valuable.
“We’re excited to bring you [mention product or service].“
3. Announce Special Offers: Inform followers about upcoming sales or discounts, creating urgency that encourages immediate action from interested buyers!
“Stay tuned for exclusive offers and updates!“
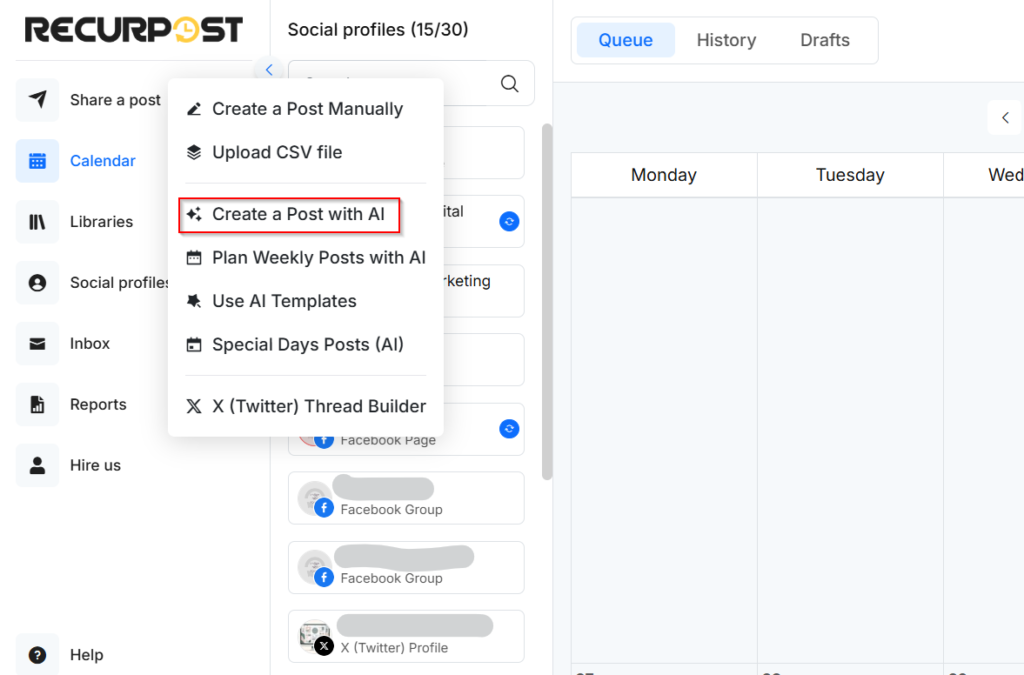
Check out: How to monetize Facebook profile.
Save Time and Manage Facebook Pages with a Scheduling Tool
Simplify with Meta Business Suite
Meta Business Suite (Facebook Business Manager) helps manage your page efficiently. Schedule posts, access insights, and automate responses. These features maintain consistent posting schedules and audience engagement without requiring daily manual updates.
Many users often ask, Why can’t I schedule posts on Facebook? This is usually due to limits in Meta Suite, which is why tools like RecurPost are a stronger choice for Facebook business page setup and scheduling.
Take It Further with RecurPost
RecurPost takes scheduling to the next level with advanced options designed to streamline content management across multiple social media platforms, including Facebook. With its intuitive dashboard, you can:
- Schedule posts in bulk for the social media page setup.
- Recycle evergreen content for consistent engagement.
- Track performance with analytics for Facebook page creation process improvements.
- Manage multiple platforms like Facebook, Instagram, Twitter, and LinkedIn from one place.
- Collaborate with team members for a seamless workflow.
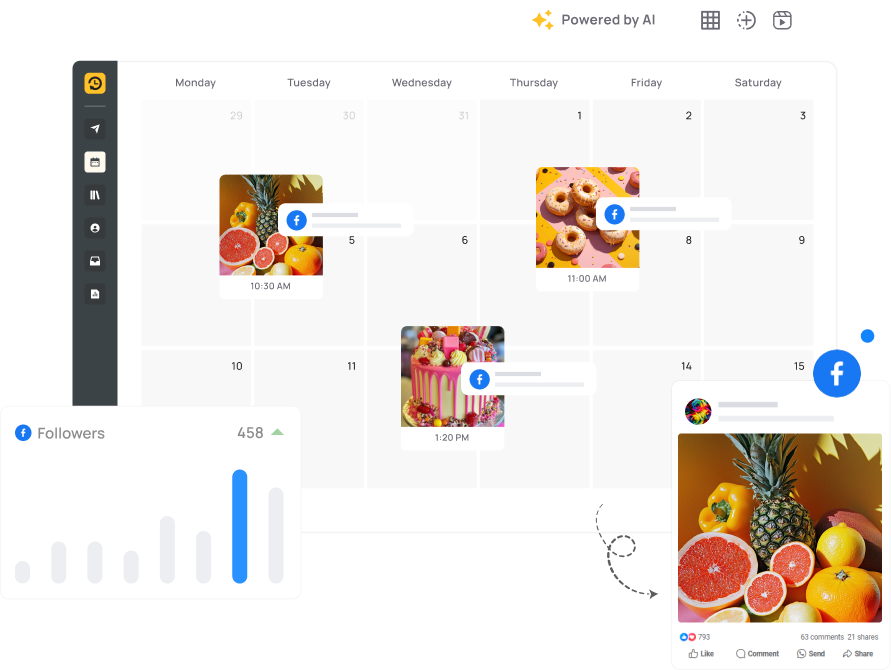
RecurPost reduces manual tasks by automating repetitive tasks and scheduling Facebook posts. This helps businesses build connections and strengthen results while maintaining a professional Facebook business account creation process.
How to Make and Maintain a Professional Facebook Business Page
Crafting the Perfect Page for Your Brand
1. Use Consistent Visual Identity
Consistency builds recognition. If your logo uses blue and white with bold fonts, use them in your profile photo, cover image, and post templates.
Design branded templates for updates like offers, testimonials, or announcements. A successful Facebook business page maintains visual consistency. For example, Starbucks uses its signature green and white colors across all posts.
2. Optimize the “About” Section
The About section should show your purpose and services. A bakery could add terms like “artisan bread,” “custom cakes,” or “gluten-free desserts” for local visibility.
Add a mission line: “We create handmade, organic baked goods to bring joy to your celebrations.”
List services clearly:
- Custom cakes for all occasions
- Freshly baked pastries and bread
- Delivery and catering services
3. Pin a High-Impact Post
A pinned post can highlight your best content. During a seasonal sale, post a graphic with text like, “20% Off Winter Apparel! Ends January 31st!”
Add a clear call-to-action: “Shop now and save!” Keep the post updated with new campaigns. This demonstrates the value of creating a professional Facebook page.
4. Use Facebook Tabs
Organizing your page with tabs helps guide visitors. For example, a clothing store can add a Shop tab to showcase products, a Reviews tab to build trust, and an Events tab for upcoming sales or pop-ups.
- Add an FAQ tab with questions like:
- “What are your shipping options?”
- “Do you offer custom designs?”
- Use the Services tab to highlight offerings, such as “Free consultations” or “Same-day delivery.”
5. Create a Unique Page Username
A unique username helps people find and remember your page. For instance, if you own a café called “Sunny Side Coffee,” a username like @SunnySideCoffee works well.
- If your business serves a specific location, try adding it: @SunnySideCoffeeBoston.
- Avoid overly long usernames like @SunnySideCoffeeShopInBoston.
6. Use Testimonials and Case Studies
Social proof is essential for building trust with your audience. Regularly share customer testimonials, success stories, or case studies to highlight your value.
- Create a “Review of the Month” series to spotlight happy customers.
- Share before-and-after scenarios to demonstrate your product or service impact.
7. Embed Videos in Key Sections
Videos are a powerful way to engage your audience and communicate your brand story. Replace static cover photos with dynamic videos that showcase your products, services, or customer experiences.
- Keep videos under 60 seconds, such as a 30-second product demo for a skincare line.
- Add captions: “Check out our hydrating moisturizer in action!”
Check out: Facebook video downloader and how to delete a group on Facebook?
How to build a Facebook page for your small business
Here are actionable strategies to make your Facebook efforts count:
1. Repurpose Content Across Platforms
For example, if you publish a blog post titled “5 Tips for Better Home Workouts,” you can:
- Create a Facebook post summarizing the tips.
- Turn it into a short video or infographic for stories.
- Use it as ad content to promote related products.
RecurPost automates sharing across groups and pages, helping with social media page setup and consistency.
2. Use Local Features
Use Facebook’s marketing tools to connect with local audiences. The “Check-In” feature encourages customers to tag your location, boosting visibility to their networks. For example:
- Offer discounts or freebies to customers who check in, like “Show us your check-in for 10% off your order.”
- Run location-based promotions targeting people within a specific radius, such as “Free delivery within 5 miles.”
These strategies strengthen a local business’s Facebook page and increase reach.
3. Utilize the Marketplace for Free Exposure
Facebook Marketplace is a free tool that allows businesses to showcase their products or services. Marketplace is especially effective for small businesses looking to engage local buyers without spending on ads. For example, a local bakery could list specialty cakes for events.
- Use high-quality, eye-catching images to attract potential buyers.
- Write keyword-rich descriptions, e.g., “Custom wedding cakes in [Your City].”
4. Post at the Right Time
Timing is crucial for maximizing engagement. Use Facebook Insights to track when your audience is most active and post during those windows.
- For instance, if your audience is active at 7 PM, schedule content for that time.
- Experiment with off-peak hours to reach less crowded timelines, such as early mornings or late nights.
This improves reach for a Facebook Business Page and supports the Facebook business page categories list.
5. Collaborate with Local Influencers
Micro-influencers can provide affordable and authentic promotion for your brand. Partner with influencers in your niche or area to showcase your products or services. For example:
- A restaurant can invite a food blogger to try their menu in exchange for a review.
- Offer discounts or free products to influencers who promote your Facebook business page through their content.
[Learn more: Facebook jail]
6. Run Budget-Friendly Ads
Running Facebook ads doesn’t require a large budget to be effective. Start with as little as $5/day using the ad budget optimizer.
- Test multiple ad creatives (e.g., images vs. videos) and audience groups through A/B testing.
- Target niche audiences like “women aged 25–35 interested in fitness in [Your City].”
This method strengthens Facebook for business setup and builds awareness.
7. Engage Through Messenger and Groups
Facebook Messenger and groups are great for direct interaction with your audience. These tools help build strong relationships with your audience and create a loyal community around your business. For example:
- Use Messenger for quick customer support and automate FAQs with chatbots.
- Create a group for your niche, like “Healthy Living Community,” to share exclusive content.
- Engage group members through polls, live Q&A sessions, or sneak peeks of upcoming products.
These steps help build credibility and demonstrate active engagement with your audience.
8. Create a Facebook Fan Page for Business
If you want to grow a strong community, you can create a Facebook fan page for your business instead of only using a traditional page. Fan pages offer interactive, community-driven content that boosts engagement and loyalty.
9. Build a Facebook Sales Page
A well-optimized Facebook sales page can help turn visitors into customers. To do this:
- Use high-quality images and videos of your products or services.
- Include clear calls-to-action, such as “Buy Now” or “Book a Consultation.”
- Utilize Facebook Shop to showcase your products directly on your page.
Conclusion: Your Next Steps to Drive Sales with Facebook
A Facebook Business Page drives sales, builds reach, and grows visibility. Small businesses and entrepreneurs can use it to connect with customers, promote services, and expand their brand.
To begin, create a Facebook business page using clear setup steps so your page is easy to find. After setup, your Facebook business sign-up grants you the tools you’ll use daily.
RecurPost simplifies management with scheduling, automation, and analytics. It helps you run a page smoothly while focusing on growth. If you wonder how to create a Facebook business page step by step in 2026, follow the updated guide to secure your account properly.
Complete your Facebook business page setup guide 2026 to attract and convert buyers. For broader exposure, expand to other digital platforms alongside Facebook.
[Learn more: how to lock a Facebook profile]
Frequently Asked Questions
1. How do I set up a Facebook Business page?
To set up a Facebook business page, go to Facebook’s “Create” Menu, select “Page”, choose a business category, and fill out your business details. After you’ve set it up, you can use your Facebook business page login to access the dashboard at any time.
2. How to create a Facebook business page without a personal account?
No, Facebook requires you to have a personal account to manage a business page. However, your personal profile won’t be visible on the business page, and you can add other admins to reduce dependency. If you’re stuck on choosing a page name, a FB page name generator can help you come up with a unique and brand-friendly option.
3. How to create a custom URL for a Facebook business page?
Go to your page settings, click on “Page Info”, and set your username under the “Username” section. Ensure it’s unique and reflects your brand.
4. How do I delete a Facebook business page?
Go to “Settings” > “General” > “Remove Page.” Click “Delete [Page Name],” and confirm your decision. However, note that it may take up to 14 days for the page to be permanently deleted.
5. How do I set up a Facebook Shop?
Go to your business page, click on “Shop,” and follow the setup wizard. Add product descriptions, prices, images, and inventory details to enable direct purchases from your page. If you’re exploring apps like Facebook for e-commerce, consider platforms like Instagram Shops and Shopify.
6. Can I transfer ownership of a Facebook business page?
Yes, assign a new admin in the “Page Roles” section. Once they’re added, you can remove yourself if needed. Ensure the new admin understands their responsibilities before the transfer.
7. Why can’t I add a category to my Facebook page?
Facebook limits the number of categories you can select to three. Ensure the chosen categories align with your business type to maximize discoverability. If you’re new to managing pages, understanding Facebook basics will help you navigate these settings easily.
8. Is there a limit to the number of admins on a Facebook business page?
No, you can add as many admins as you like. Assign roles like Editor, Moderator, or Analyst based on their responsibilities to maintain security and efficiency.
9. How to create a Facebook page on mobile?
The process is simple and can be done right from your iPhone or Android device. Just open the Facebook app, tap the “Pages” icon in the menu, and then select “Create New Page.” The app will guide you through the same steps as the desktop version.

Shalini Nagar is an experienced content writer with a proven track record of creating diverse and engaging content across various formats. With years of expertise in crafting blogs, articles, she excels at delivering compelling narratives tailored to different audiences.

