Many users ask: “How do I delete a Facebook group?” This question often comes up when random group notifications appear.
In Facebook’s early years, people joined countless groups during the rush of new account sign-ups and growing connections.
Groups formed around school friends, families, games, or hobbies multiplied quickly, leaving users tied to inactive groups such as old sports clubs.
As Instagram, Snapchat, and WhatsApp expanded, Facebook users moved from casual groups toward communities with clear interests or professional purposes.
Today, people delete a Facebook group once it loses relevance, whether it’s a quiet family group, an outdated page, or a forgotten hobby club.
TL;DR
- Admins can delete a Facebook group permanently by removing every member, then using the “Leave and delete” option as the last person in the group.
- Mobile deletion process: open Groups in the Facebook app, pick your group, use Admin Tools to access the member list, remove members one by one, then tap “Leave Group” and confirm deletion.
- Desktop deletion process: open Groups from the sidebar, choose your group, click Members, remove everyone, then select “Leave Group” beside your name and confirm “Leave and delete.”
- If you leave while others are still in the group, ownership transfers instead of deleting it.
- Alternatives to deleting a group:
- Archive the group: hidden from search, no new members, but past posts remain.
- Rebrand or transfer ownership to maintain activity and keep the group running.
We have compiled all the steps below for deleting a Facebook group from your phone and desktop.
How to delete a Facebook group as an admin?
Pages and Groups on Facebook

Facebook pages represent businesses, brands, or public figures. Pages share updates, promote services, and act as the official identity of the brand or person
Facebook groups connect people around shared interests. Group creators set privacy levels, and groups host everything from work chats to events, hobbies, or fundraising causes.
As a group admin, you can delete a Facebook group by first removing all members, then leaving the group yourself. Mobile and desktop follow slightly different steps to delete a Facebook group.
How to Delete a Facebook group on Mobile when You are the Admin?
- Open the Facebook app and log in first to start the deletionion process. The home screen shows your News Feed.
- Tap the menu in the top right (bottom right on iPhone). Select Groups and choose your group.

- A menu opens. Scroll to the Groups section and tap it.

- The group feed displays a carousel of groups you manage or joined. Pick the group you want to delete.

- Tap the Admin Tools (star icon in the top right).
- Under Members, remove each member one by one. Facebook does not offer bulk member removal.

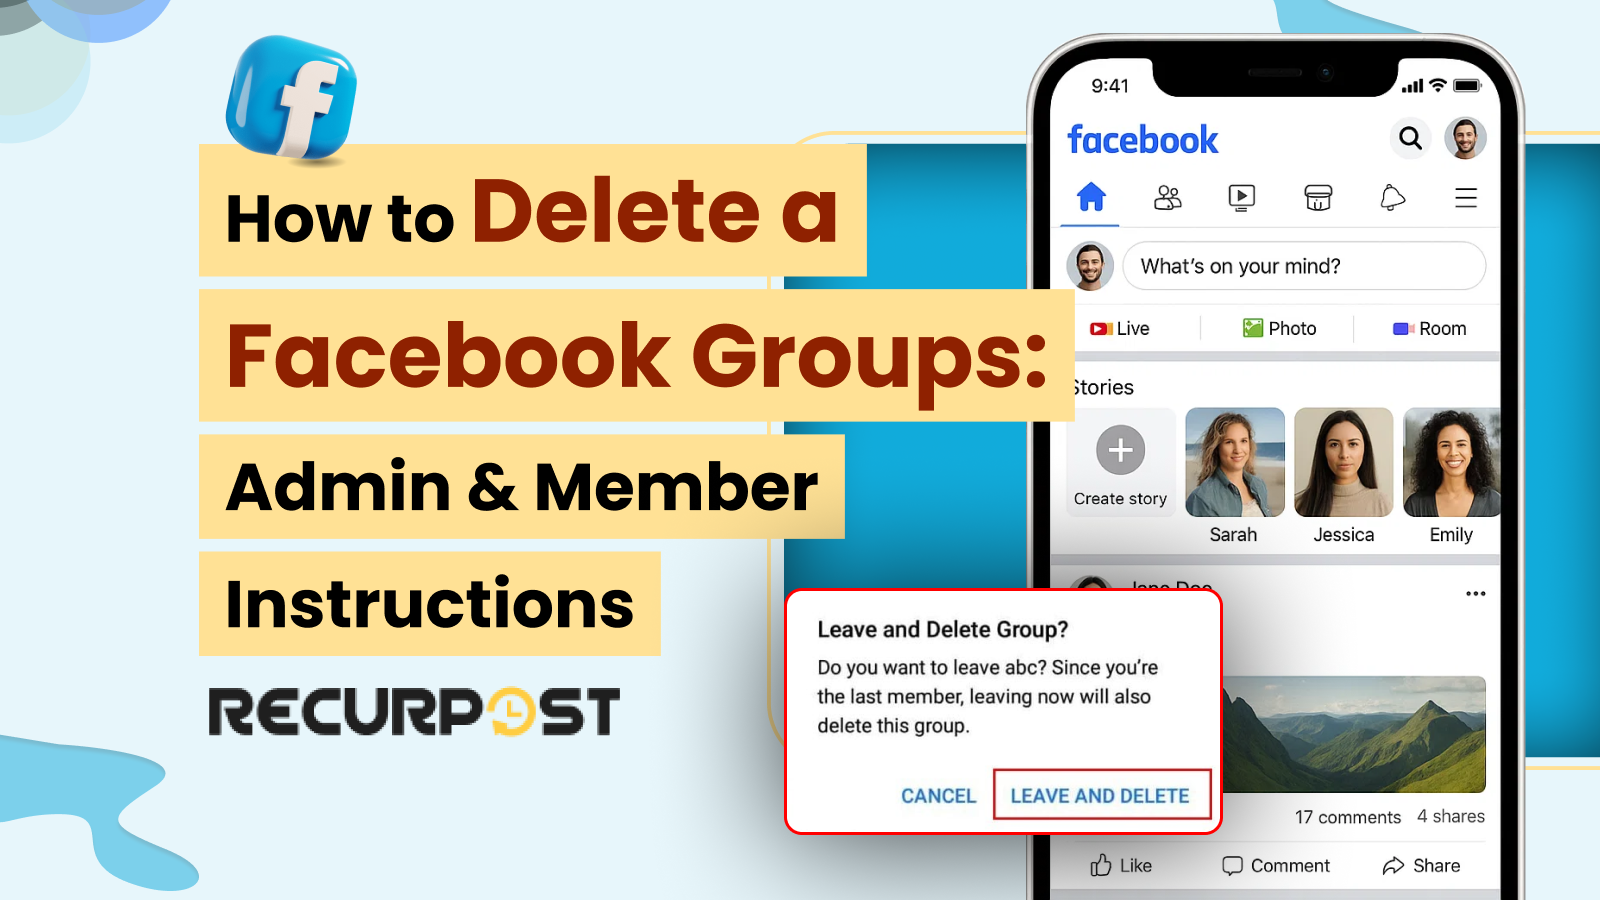
- Return to Admin Tools. Tap Leave Group. A pop-up appears. Select Leave and delete to permanently remove the group.

Note:
- If other members remain, admin rights transfer to them. The Leave and delete option appears only when you are the final member.
- Alternative: Instead of deletion, you can archive the group. Archived groups vanish from Facebook search, and no new members can join, but past posts stay visible.
- Only the original group creator or group owner can permanently delete a Facebook group. Other admins may only archive it.
Delete a Facebook group from your desktop when you are the admin
- Go to facebook.com and log in for the initiation of the deletion process. Your News Feed loads after sign-in.
- On the left panel, under Explore, click Groups to see all the groups you manage or joined.

- A list of your groups appears on the left side. Select the group you want to delete where you have admin privileges
- Open the Members tab in the left menu to view everyone in the group.
- Next to each member’s name, click the three dots (More). Select Remove from group. Repeat until all members are removed.
- As the last member, click the three dots next to your name, choose Leave Group, then confirm Leave and delete.
When you are not the owner of the group
If you only want to leave a group (not delete it), open the group, click the three dots, and select Leave Group. Confirm to exit.
Get Free Facebook Group Marketing Hacks
Subscribe now for expert tips, proven strategies, and viral growth tricks from top community managers.
Is Your Business Group Underperforming, and Do You Want to Delete a Facebook Group?
Facebook groups for business can support marketing, but not all perform as expected. Large groups demand time, and if they fail to support business goals, it may be best to delete them.
Deleting a Facebook group is permanent. All content, members, and connections disappear. Before deletion, consider these options:
1. Rebrand the group
Rebranding may revive interest and avoid the need to delete the group. If members don’t connect your group to your business, change the name, update the cover photo, and link your Facebook page.
Use publishing tools to keep updates regular so you won’t need to delete a Facebook group due to inactivity.
2. Add active Admins to avoid Group Deletion

Removing a group with active members may hurt your brand reputation. Bring in trusted members as admins rather than deciding to delete a Facebook group.
Ask loyal members to take admin roles in the Facebook group. Announce changes, update the group’s name, and pin a welcome post to explain the shift.
You remain the group owner, while admins keep the group active. Scheduling tools help maintain activity, reducing the chance you’ll need to delete a Facebook group. Check out the guide for schedule posts on Facebook groups for more details
3. Archive the group
Archiving is reversible, unlike deleting the Facebook group. Archived groups keep posts and conversations visible to members, but stop appearing in search. New members cannot join.
This option suits admins who lack time and do not want to delete the group while still preserving useful content. Members can still view past posts.
Groups can be un-archived at any time if you decide to revive them. Check the Facebook Help Center for more guidance.
Conclusion
Removing old groups can feel refreshing and means no more unwanted group activity. Always review alternatives like archiving or rebranding before deciding to delete a Facebook group. If you choose deletion, keep the lessons learned from running the group to apply in future communities.
Frequently Asked Questions
1. How to delete a Facebook group?
Steps to delete a Facebook group:
1. Log in to Facebook.
2. Go to the group you want to delete.
3. Click the three dots under the cover photo.
4. Choose Group settings.
5. Scroll to the bottom and select Delete Group.
6. Confirm and enter your password for deleting the group
2. How to delete a Facebook group without removing all members?
Currently, Facebook does not allow this. To delete a Facebook group, you must remove all members first, then delete the group.
3. If you delete a post on a Facebook group, will the person receive a notification?
No. If you delete a post in a group, the original poster does not receive a notification. The post disappears from the group feed.
4. How to delete all groups on Facebook at once?
Facebook doesn’t offer a bulk delete option. You must leave or delete groups one by one. Third-party tools like Facebook Group Manager may speed this up, but use them cautiously as they aren’t officially supported.
5. How to delete a Facebook group with thousands of members?
When deleting a large group:
1. Post a notice about the upcoming deletion.
2. Give members time to save content.
3. Use Facebook’s Download Your Data tool if you want to keep posts.
4. After notice, remove members and delete the group.
6. How to delete a private group on Facebook?
Steps to delete a private Facebook group:
1. Log in and open the group.
2. Click the three dots.
3. Select Group settings.
4. Scroll down, choose Delete Group, and confirm with your password.
7. How to leave multiple Facebook groups at once?
Facebook does not support batch leaving, but you can:
1. On desktop: open Groups, hover over each, click the three dots, and choose Leave Group.
2. On mobile: open the app, tap Menu → Groups, then leave groups one by one.
3. Use browser extensions (with caution) for bulk leaving.

Dr. Dinesh Agarwal, founder of RecurPost, holds a PhD in Cloud Computing and transitioned from academia to social media innovation in 2013. He built RecurPost into an enterprise-grade automation platform now used by over 100,000 businesses worldwide. Beyond leading RecurPost, Dr. Agarwal shares insights on social media marketing through talks, podcasts, and articles, with a focus on content optimization and algorithm-driven distribution.