If you’re trying to grow on YouTube, the first thing you need to know is how to use YouTube Studio.
Best of all, YouTube Studio is free for everyone with a channel.
YouTube Studio serves as the platform where creators upload videos, check analytics, interact with audiences, and activate monetization features like ads. YouTube popularized “viral” content while establishing itself as a platform for education, activism, and journalism through tutorials, online courses, and citizen reporting during major events.
This blog will show you exactly how to use YouTube Studio on both desktop and mobile to manage your channel, check performance, and stay on top of your content.
What is YouTube Studio
Learning how to use YouTube Studio for free is valuable for YouTube channel owners who need to manage videos, track performance metrics, respond to viewers, configure advertisements, modify channel layouts, and monitor earnings.
YouTube Studio operates on both desktop and mobile devices with a sectioned layout for quick navigation. YouTube Studio replaced the previous YouTube Creator Studio after the redesign, making it even easier to learn how to use YouTube Studio efficiently.
YouTube Studio is available to all creators and connects with tools that assist with video posting, comments, and performance tracking. Hence, it is important to learn how to use YouTube Studio. Hence, it is important to learn how to use YouTube Studio.
How to Access YouTube Studio
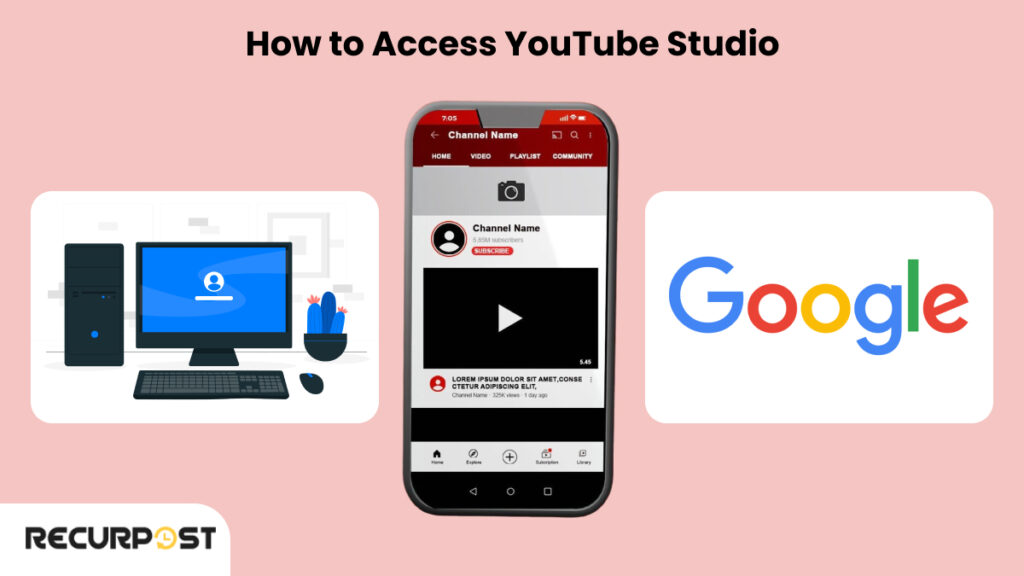
YouTube Studio works on desktop and mobile. Here’s how to use YouTube Studio on different devices.
Desktop Access
Navigate to studio.youtube.com and sign in with your YouTube channel’s Google account to access the complete dashboard with all features. This is how to use YouTube Studio in full on a computer.
Use the YouTube Studio Mobile App
Download the YouTube Studio app from the Play Store to learn how to use YouTube Studio on Android, or from the App Store for iOS devices, allowing you to check analytics, respond to comments, and edit basic video details while mobile.
Google Account Required
YouTube Studio requires sign-in with a Google account linked to your YouTube channel for access before you can begin learning how to use YouTube Studio effectively.
YouTube Studio Dashboard
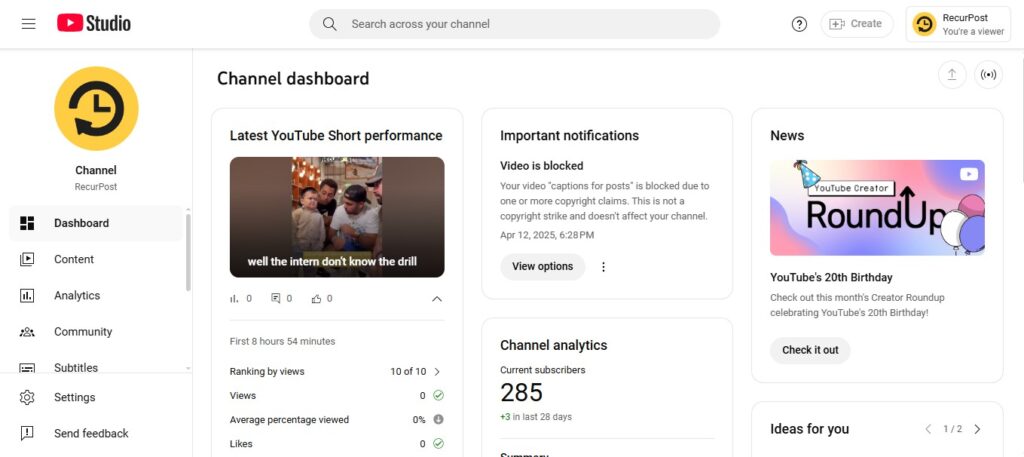
The YouTube channel dashboard is the first thing you see when you access YouTube Studio. If you’re learning how to use YouTube Studio, this dashboard is your control room for everything.
Layout and Main Sections
The left-side navigation menu contains these main sections that guide you through how to use YouTube Studio efficiently:
- Dashboard: Quick stats and video performance metrics in your creator dashboard
- Content: List of all your videos, shorts, live streams, playlists, posts, and promotions
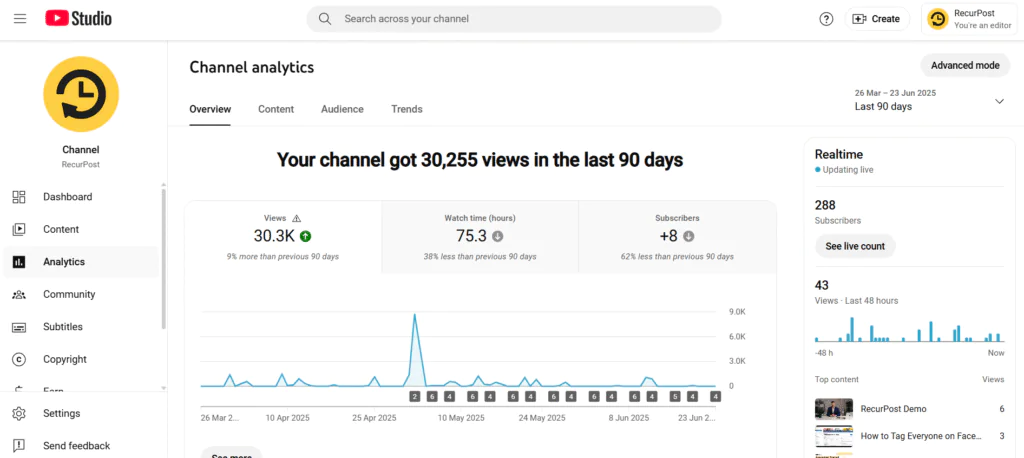
- Analytics: Views, watch time, and other data
- Monetization: Details on monetization features, ad revenue, and channel memberships
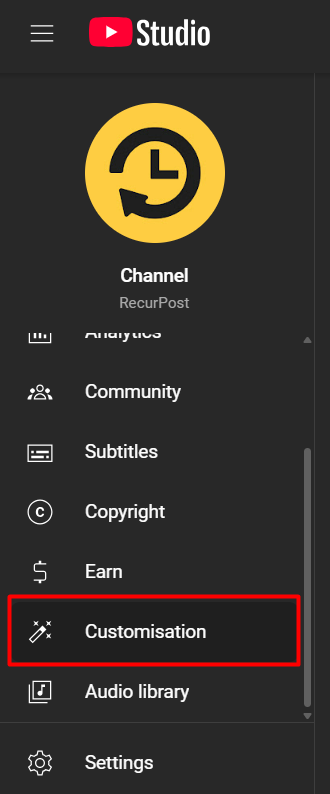
- Customization: Layout, branding, and basic channel info
- Settings: General options in the settings menu, including currency and channel permissions
Quick Stats
The dashboard displays video performance metrics, subscriber counts, and recent comments without requiring navigation to individual sections, key to mastering how to use YouTube Studio fast.
How to Customize the Dashboard
Dashboard information updates automatically based on recent uploads and viewer activity, showing essential data at a glance for those learning how to use YouTube Studio like a pro.
YouTube Feature Eligibility
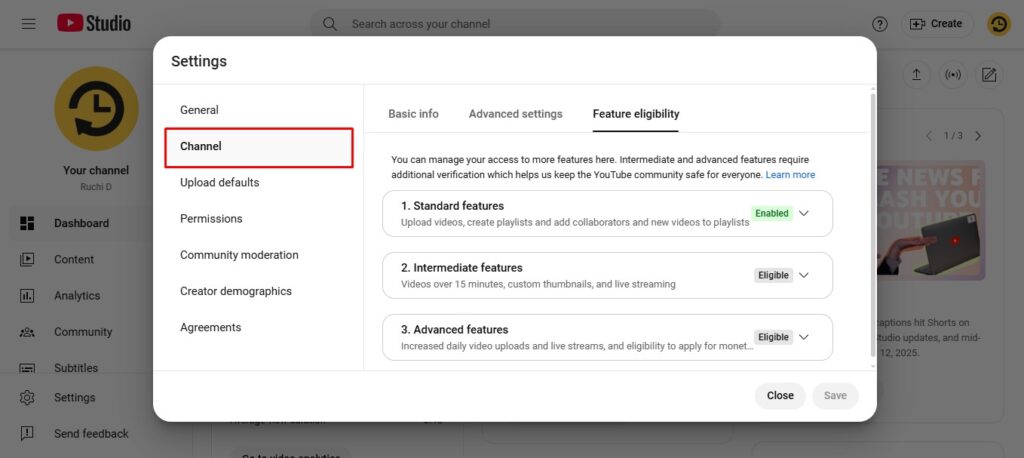
To check what’s active on your account: Go to YouTube Studio → Settings → Channel → Feature Eligibility
It’s a handy section when learning how to use YouTube Studio to unlock features.
YouTube organizes feature access into three progressive levels: Standard, Intermediate, and Advanced, which unlock as channels meet specific requirements. As you explore how to use YouTube Studio, knowing these levels helps you plan your next steps.
Standard Features
Get your channel started and begin reaching viewers.
You can:
- Upload videos
- Create playlists
- Add new videos to existing playlists
- Add collaborators to playlists
Requirements: Your channel must have no active Community Guidelines compliance issues. If you’re just learning how to use YouTube Studio, this is where most people begin.
Intermediate Features
Open more tools to grow your audience and add more content options.
You can:
- Use custom thumbnails
- Go live with live streaming
- Upload videos longer than 15 minutes
Requirements: Enable feature levels (standard) and verify your phone number. Knowing how to use YouTube Studio properly means understanding when to unlock it.
Follow these YouTube channel verification steps. Once finished, your YouTube account verification will unlock all features instantly.
Step 1: Sign in to your channel with the right Google account
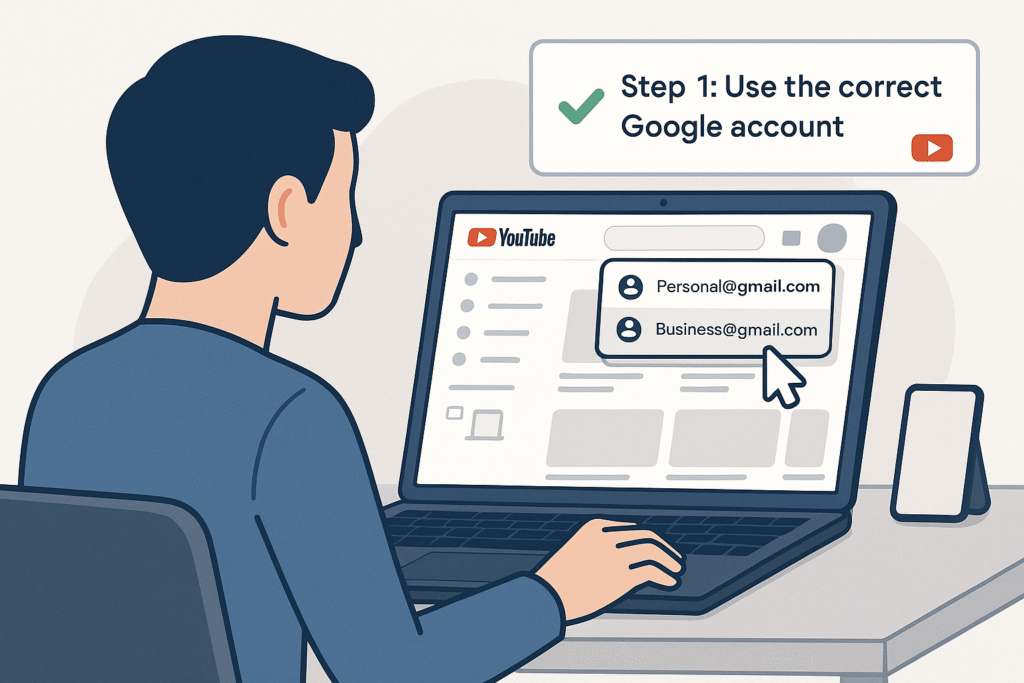
Log in to the Google/YouTube account linked to the channel you want to verify. If you have multiple accounts, make sure you select the correct one.
To verify your YouTube account, you can complete the process from a computer or mobile browser. Keep in mind that YouTube only verifies existing channels, so you’ll need to create your channel first if you haven’t already.
Step 2: Go to the verification page
Open the YouTube verification page in two ways:
- The fastest way is to go directly to youtube.com/verify.
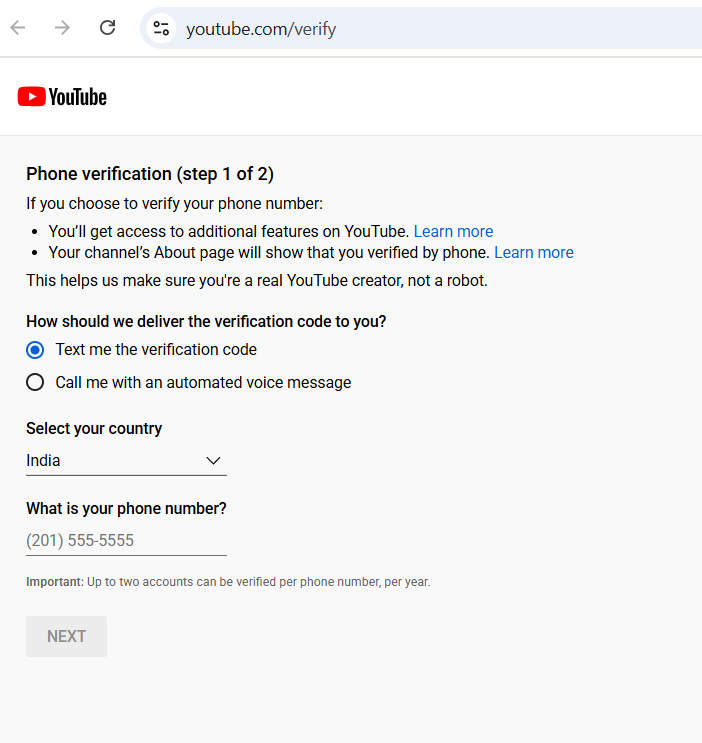
Or, if you’re already in YouTube Studio, follow these steps:
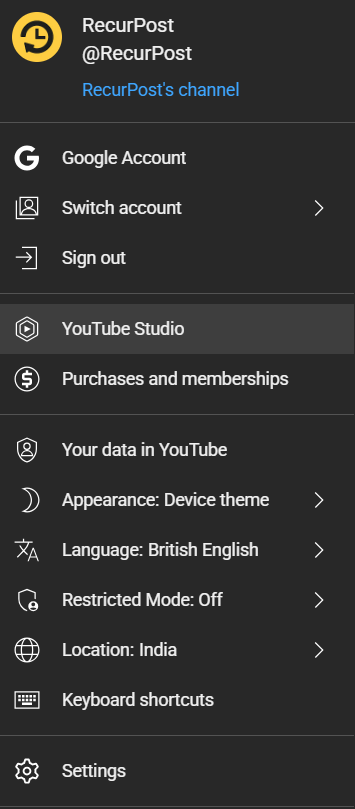
1. Click your profile picture (top-right corner), then choose YouTube Studio.
2. In the left menu, click Settings (look for the gear icon at the bottom).
3. Select Channel, then click on Feature Eligibility.
4. Under Intermediate features, you’ll find the option to Verify Phone Number.
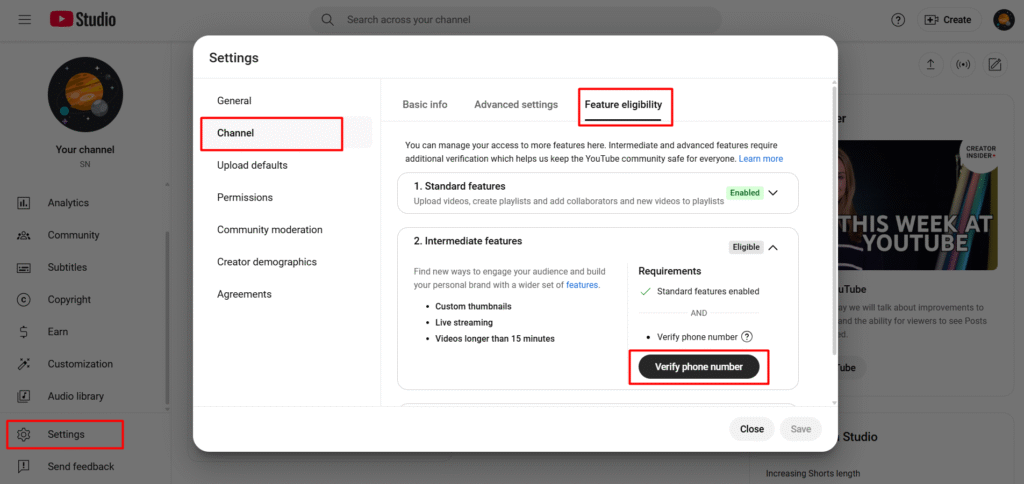
Both routes lead you to the YouTube verification process.
Step 3: Select the country and verification method
YouTube requires these details:
- Select your country to format your phone number verification correctly. This ensures the verification code is delivered in the right format and language.
- Choose your verification method: SMS (text) or voice call. If SMS doesn’t arrive, retry with voice call verification.
Tip: If one method doesn’t work, try the other. Sometimes a carrier may block automated messages, but this is rare.
Step 4: Enter your phone number
Enter your phone number and double-check before submitting. An incorrect number prevents code delivery.
Here’s what you should know:
- You don’t have to use your personal number, but you must use a number you can access right away since you’ll need to get the code quickly.
- YouTube doesn’t display or share your number publicly.
- Both mobile phones and landlines work. If you’re using a landline, be sure to select the voice call option (landlines can’t receive texts).
- One phone number can verify up to two channels per year. If you manage several channels or help clients, plan and spread out your verifications as needed.
- Once you’ve entered your number, click Submit or Next to move on.
Step 5: Receive the verification code
YouTube (through Google) sends a 6-digit verification code via your selected method:
- If you chose text, check your messages for a code from Google/YouTube.
- If you choose voice call, you’ll get a phone call with a robotic voice reading the code out loud. It usually repeats the code twice; have a pen or notepad ready, or use speaker mode so you can type the code while listening.
Step 6: Enter the verification code on YouTube
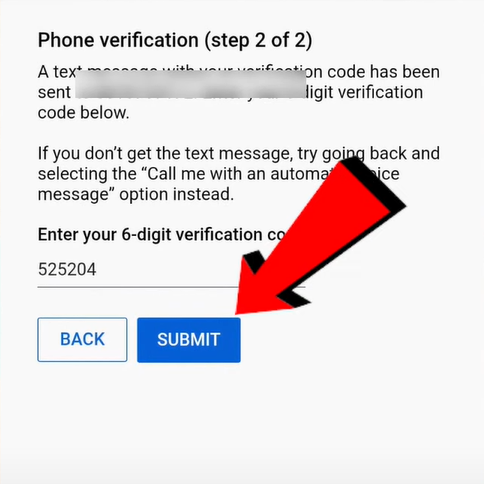
- Enter the 6-digit code on the verification screen. Click Verify or Submit to complete the process.
- YouTube instantly verifies your channel with the correct code. Expired codes or typos generate an error message with an option to retry.
Step 7: Verification confirmation
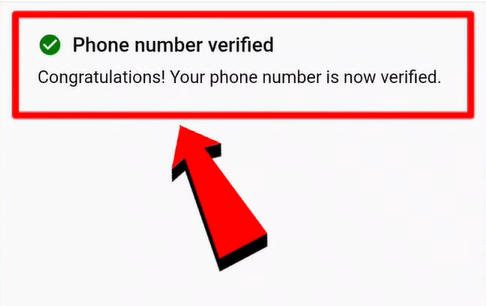
After successful verification, a confirmation message appears. While YouTube reserves gray checkmark badges for channels with 100,000+ subscribers, verification activates powerful features for your channel.
To double-check your status:
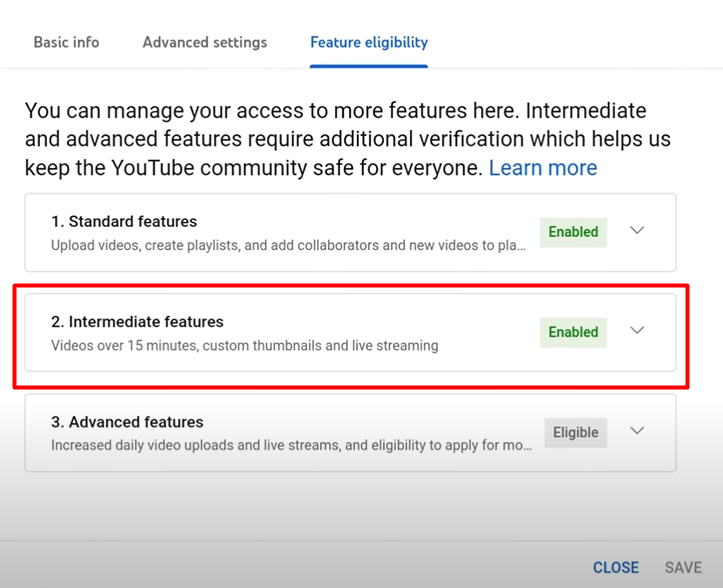
- Go back to YouTube Studio.
- Click Settings → Channel → Feature Eligibility.
- Under Intermediate features, you should now see that features like custom thumbnails, videos over 15 minutes, and live streaming are enabled.
You might also get an email from YouTube confirming that your phone verification was successful.
Advanced Features
Use these tools to grow your channel and unlock advanced features on YouTube.
You can:
- Handle Content ID claims and submit appeals
- Add external links to video descriptions
- Embed live streams
- Create more live streams each day
- Upload more Shorts each day
- Test and compare different thumbnails
- Upload more videos each day
- Apply for monetization (with other requirements)
Requirements: Feature levels (intermediate) must be enabled, and you need one of these:
- Video verification
- Valid ID
- Positive channel history
Customize Your YouTube Channel
Channel layout and design in YouTube Studio establish brand identity and organize content for viewers. If you’re figuring out how to use YouTube Studio, this section helps shape your channel’s look and feel.
Channel Layout
Go to: YouTube Studio → Customization → Layout
- Add a channel trailer for new visitors
- Set a featured video for returning viewers
- Arrange sections like popular uploads, playlists, or Shorts
Arrange sections like popular uploads, playlists, or Shorts. Knowing how to use YouTube Studio layout tools makes this easy.
Branding
Go to: YouTube Studio → Customization → Branding
- Upload or change your profile picture in the branding options
- Add a banner image for your channel header
- Set a video watermark to appear during your videos
Basic Info
Go to: YouTube Studio → Customization → Basic Info
- Edit your channel name and handle
- Write a channel description
- Add business contact info
- Link to your website or social accounts
If you’re on a computer, changing your YouTube handle takes just a few clicks. But be sure to double-check your updates before hitting Publish.
1. Step-by-Step Walkthrough
1. Sign in to YouTube Studio using your YouTube account.
2. Head to the left navigation menu and click Customization.
3. Go to the Profile tab.

4. Under your channel name, click the edit icon (pencil icon) next to your current handle.
5. Type your preferred handle. YouTube will automatically check availability.

6. If your handle is taken, it’ll give you a list of suggested handles. You can tweak yours until one is free.
7. Once you’re happy, click Publish.

This updates your handle URL, your channel page, and creates your new channel URL (like youtube.com/@yourhandle).
Make sure your new name matches your brand identity and fits with your other social media accounts. That way, people won’t get confused across platforms.
2. Verification & Propagation
After you change your YouTube handle, it might take a bit for things to settle.
- Use YouTube Analytics to track any drop or spike in traffic, especially from search impressions.
- Test your old URL for up to 14 days. YouTube usually keeps a redirect to your updated URL during that time.
Keep an eye on your mentions, tags, and links.
3. Troubleshooting UI Issues
If the edit icon or handle section doesn’t appear:
- Clear your browser cache
- Try using Incognito mode
- Make sure your browser is up to date
Sometimes the left-hand menu might glitch. Refresh or switch browsers if needed.
If you’re on a mobile device, changing your YouTube handle is just as easy. Whether you’re using the regular YouTube app or the YouTube Studio app, you can switch your handle in minutes.
1. Using the YouTube App (iOS and Android)
1. Open the YouTube app on your phone.

2. Tap your profile icon in the top right corner.
3. Go to Your Channel.
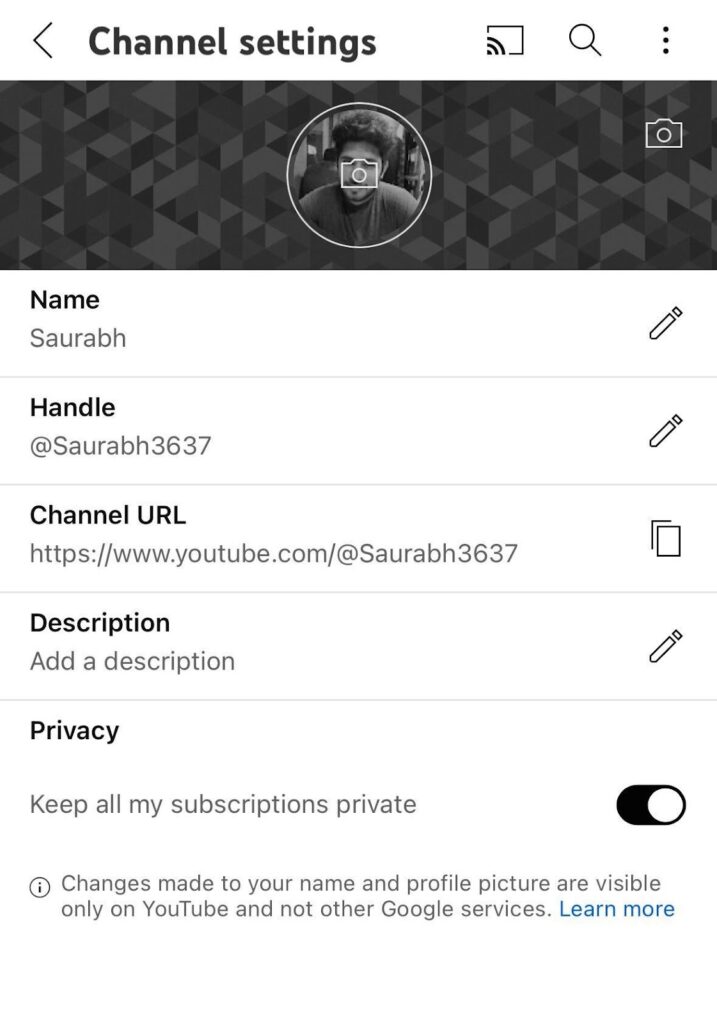
4. Tap Edit Channel.
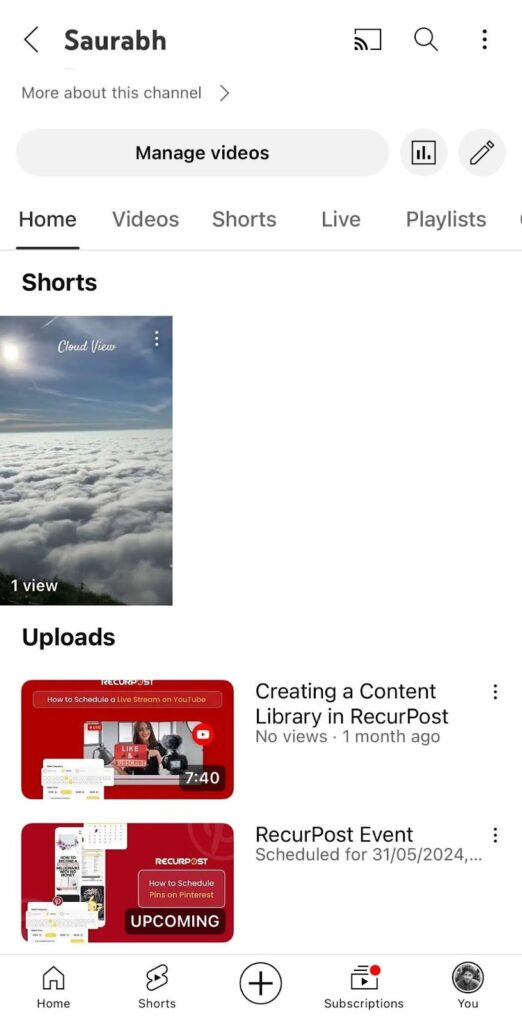
5. Hit the pencil icon next to your channel’s handle.
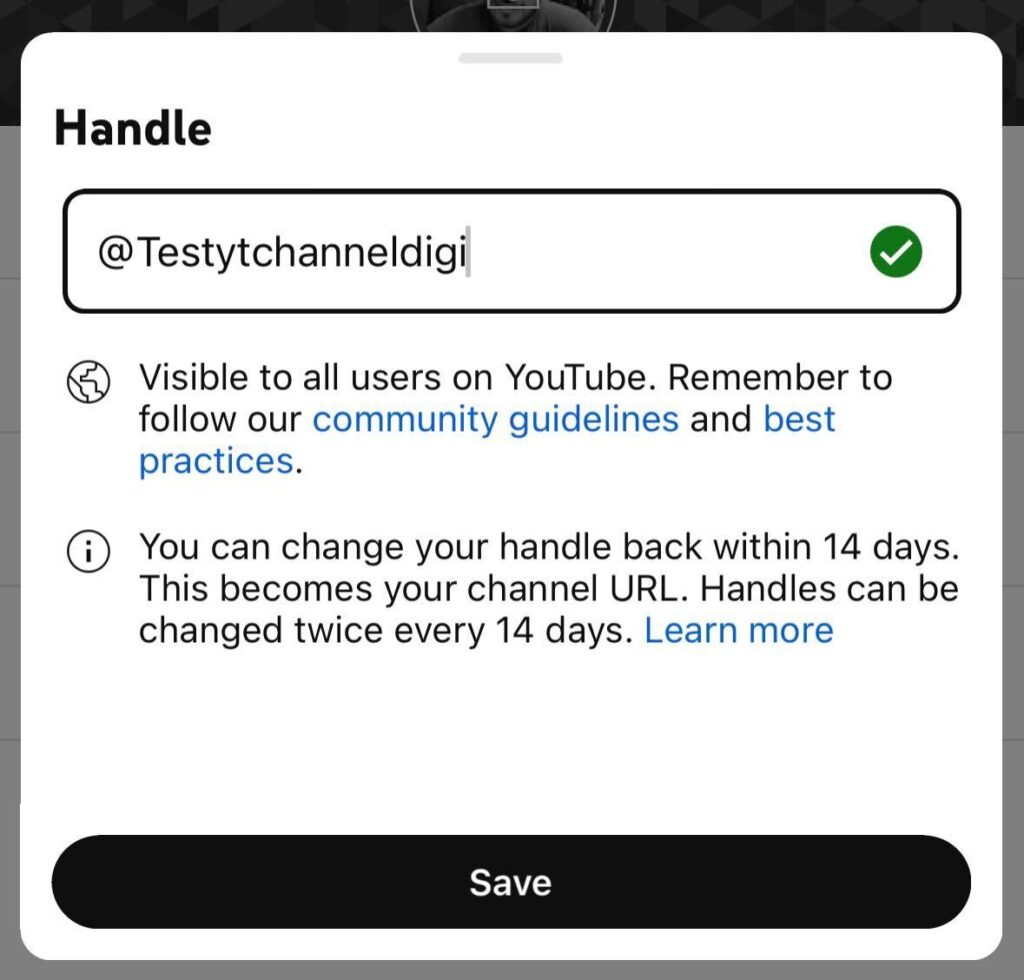
6. Type your new handle and tap Save.
Android users will see a tabbed layout, while iOS users get floating buttons. The steps are the same, just laid out a little differently.
Once saved, your channel URL and channel page will reflect the change. Your handle URL also updates right away.
2. Using the YouTube Studio App
If you’re managing more than one YouTube channel, the YouTube Studio app makes this easier:
- Open the YouTube Studio app.
- Tap your profile picture and go to View Channel.
- Tap Edit, then update your channel’s handle.
- Hit Save.
Make sure your channel name, handle, and channel description all line up. This helps your audience connect the dots, especially when they come from different social media accounts.
3. Offline Prep (Smart Move)
Before making any change, keep a short list of handle ideas saved on your phone. Write down your preferred handle, plus 2–3 backups.
Tip: If you’re working with a team, print a QR code that links to the YouTube Studio app. It makes it easier for everyone to get to the right place without searching through menus.
Manage Content in YouTube Studio
The Content tab is where all your videos live. This is where you can upload, edit, and organize everything you post. It’s also where you get hands-on with how to use YouTube Studio in your daily workflow.
1. Uploading Videos
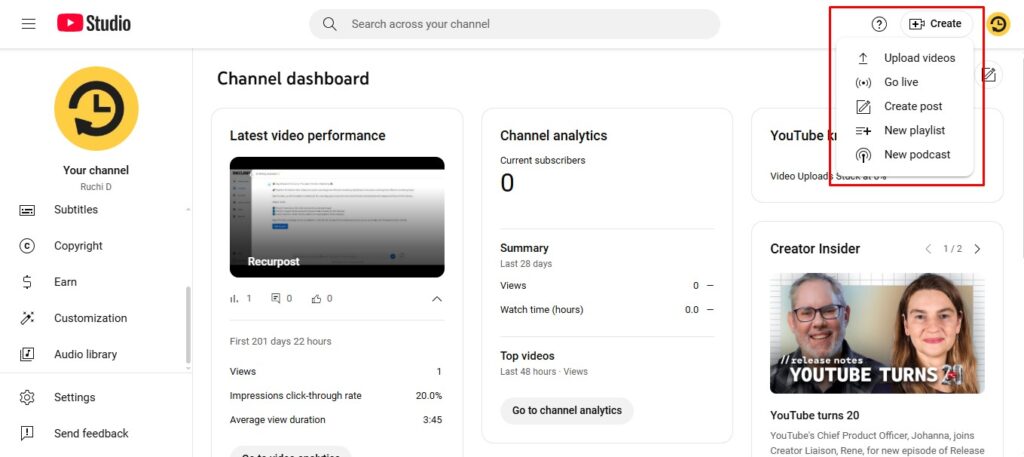
From desktop access (studio.youtube.com):
Click “Create” → Select “Upload videos” → Pick a file from your computer or drag it in
Add a title, description, and thumbnail → Add Video elements →Go through copyright checks →
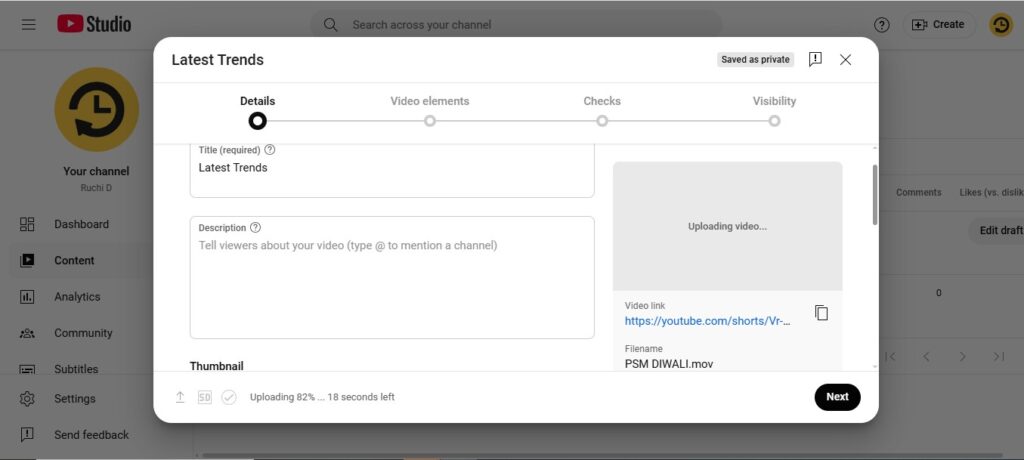
Choose visibility (Public, Private, or Unlisted) → Publish or Schedule
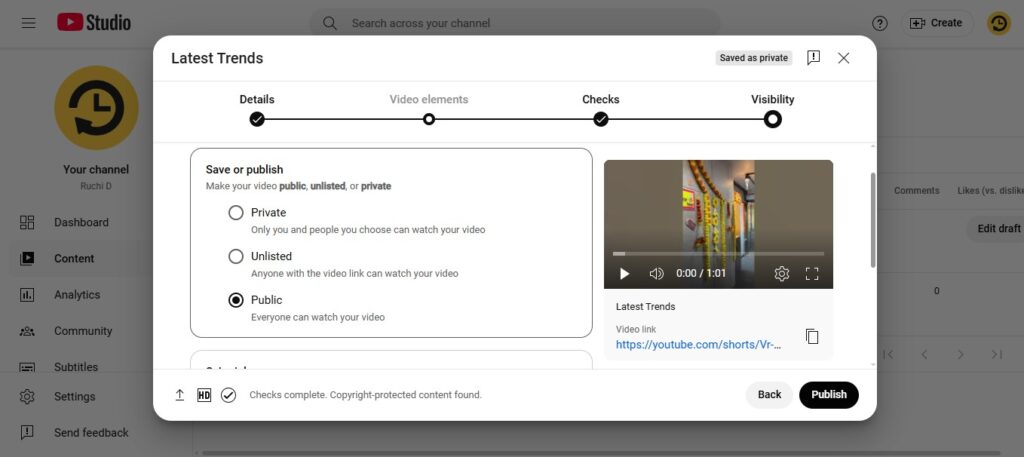
You can bulk upload videos on YouTube by following the same steps and edit videos separately!

From the app:
Tap the “+” icon → Choose “Upload a video” → Select from your gallery → Add title, description, and pick a thumbnail → Set privacy and tap “Next”
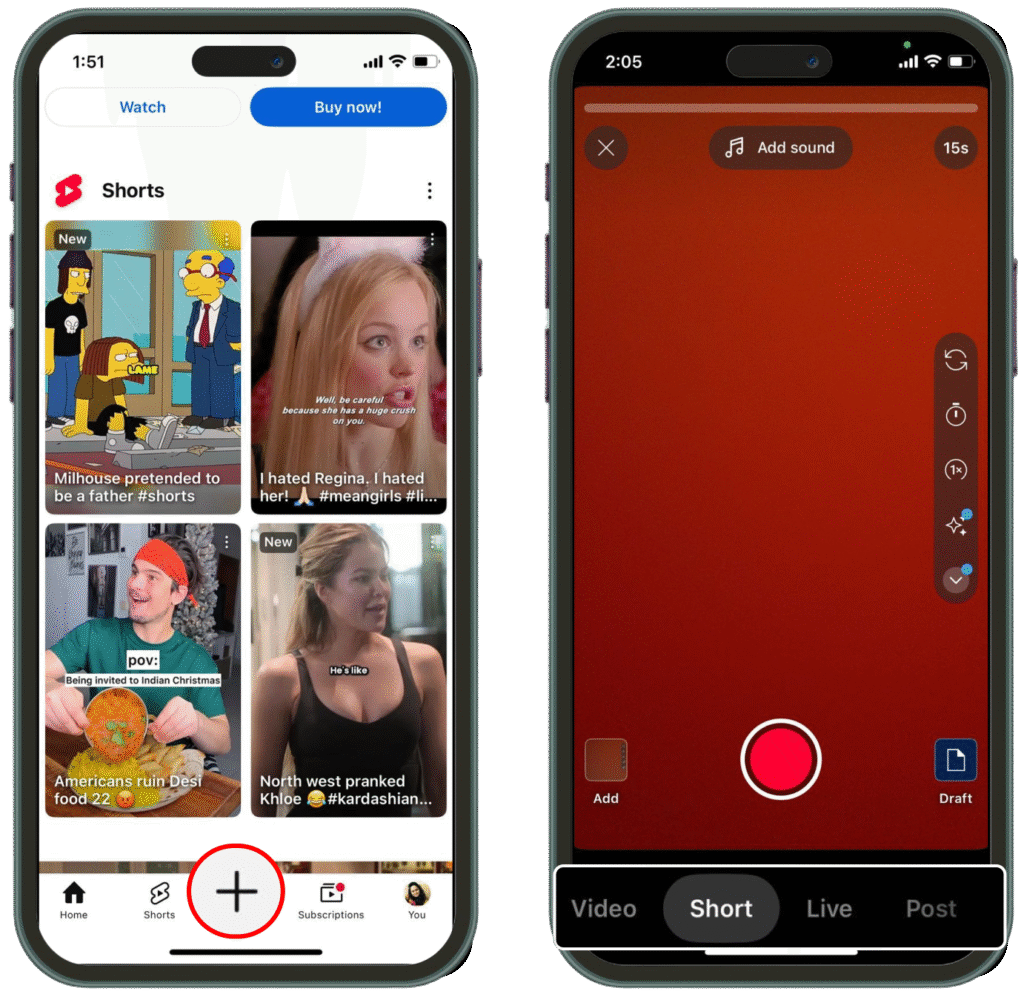
2. Editing Existing Content
On desktop:
Go to the Content tab → Click the video title → Edit title, tags, and description → Switch the thumbnail or visibility → Add end screen or cards if needed → Save
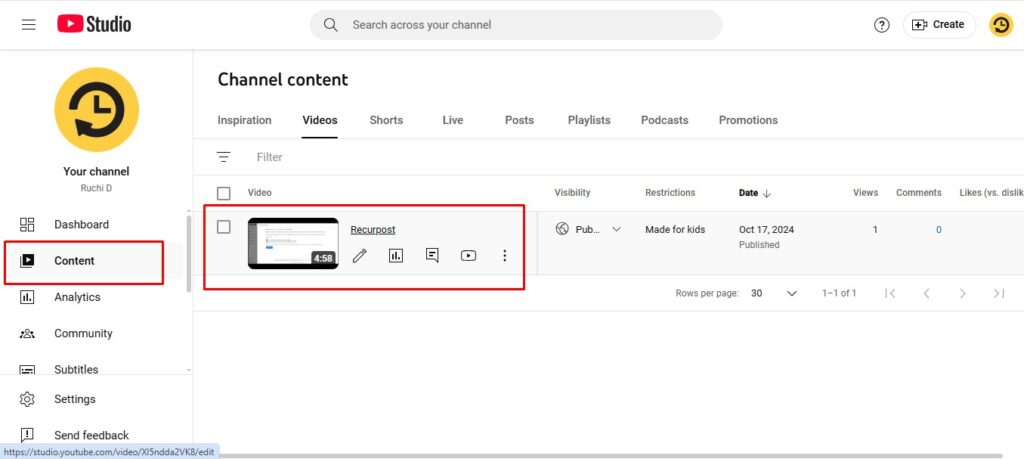
On mobile:
Open the app → Tap on a video → Tap the pencil icon → Edit text fields or privacy → Tap “Save”
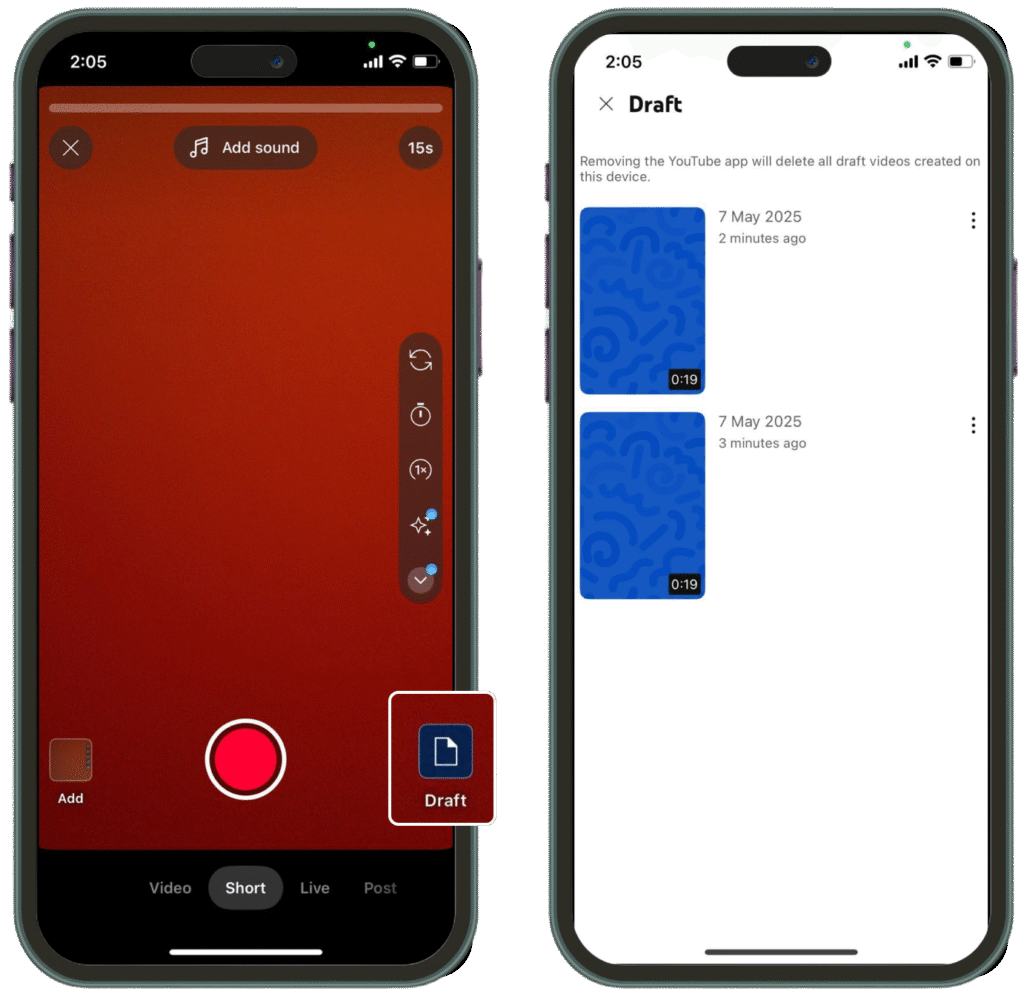
3. Using the Video Editor
The built-in editor lets you trim parts of your video, blur sections, and add music. It works best for small changes after your video is live. YouTube allows you to edit videos in draft as well as published videos.
4. Organizing Playlists and Series
Go to the Content tab → Click “Playlists” → Click “New Playlist” → Name your playlist → Add videos by clicking “Add videos” → Arrange videos in the order you want
You can also add videos to playlists directly while uploading or editing.
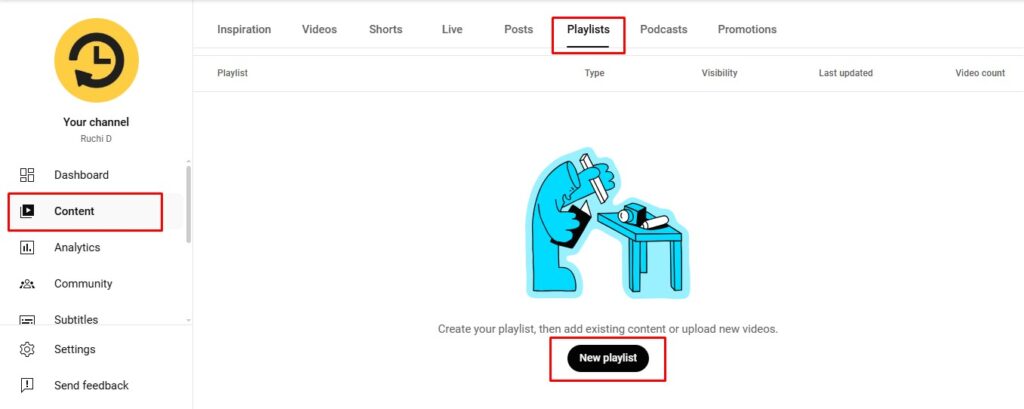
The Content tab contains most daily creator tasks.
Understand YouTube Studio Analytics
YouTube Studio displays video performance through numbers and charts, showing views, watch time, and viewer sources.
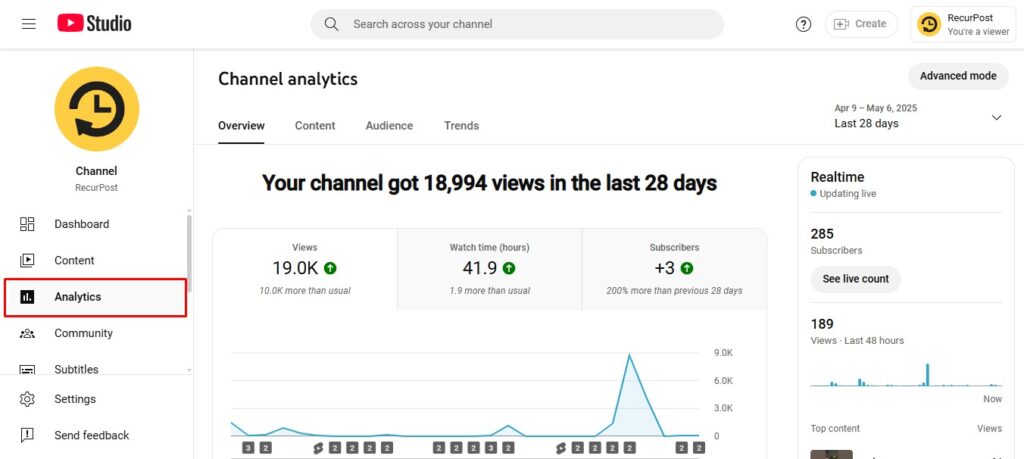
1. Overview Tab
Shows total views, watch time, top videos, and estimated revenue in your analytics tab. You can also see how your newest video is performing compared to your past uploads.
1.1 Watch time
- In YouTube Studio, open Analytics → Overview to see total watch time in hours.
- “Time watched” replaced simple view counts as the top-ranking factor back in 2012. Longer watch time tells YouTube your videos hold attention.
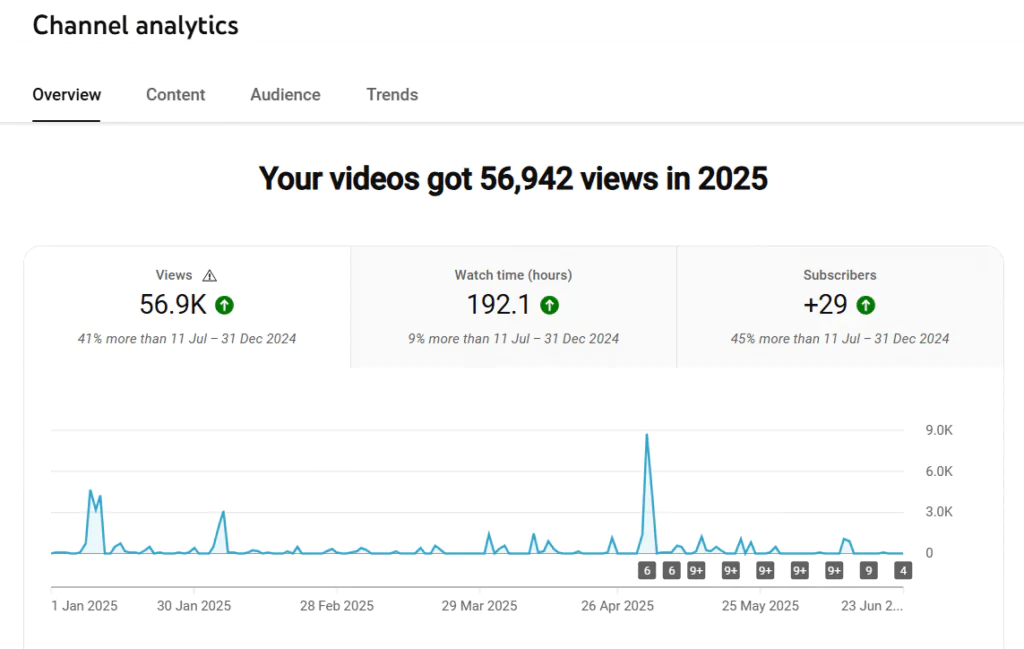
Tip: To increase the watch time, make sure that your title and thumbnail are clear enough for people to understand what to expect from the video. To increase the views, try to post videos at the best time to post on YouTube.
1.2 Audience retention metrics
- Switch to Advanced mode and pick Audience retention to view the curve of where viewers drop off.
- High retention rates often mean stronger promotion by the algorithm.
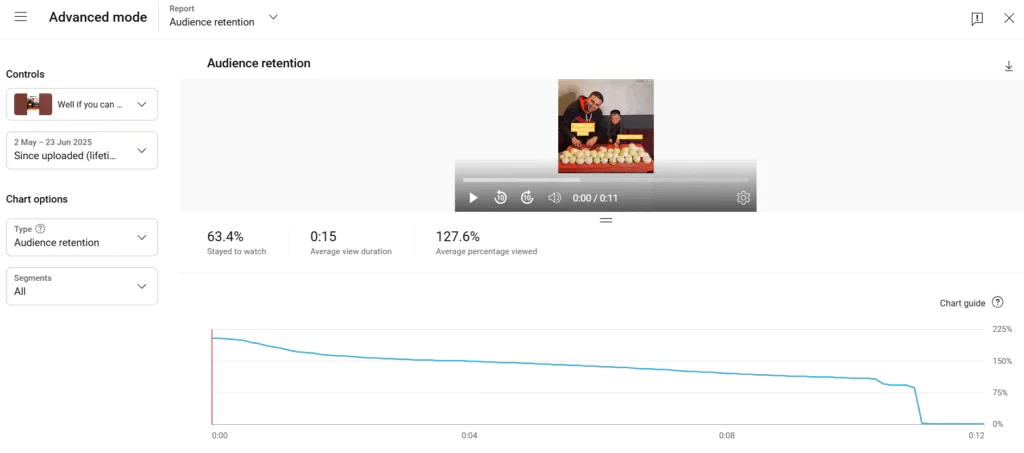
1.3 Rewatches
- In the same retention report, look for spikes where viewers loop back.
- Place prompts or calls to action around those moments to keep engagement high.
1.4 Viewer count tracking
- In YouTube Studio Analytics, find viewer data in the Overview tab alongside total views.
- The viewer count shows your true audience reach, while the ratio of views to viewers reveals how often people rewatch your content.
- A high views-to-viewers ratio indicates strong content that viewers return to multiple times.
Tip: Track viewer counts alongside total views to understand whether growth comes from attracting new people or increasing rewatches from existing viewers.
2. Content Tab
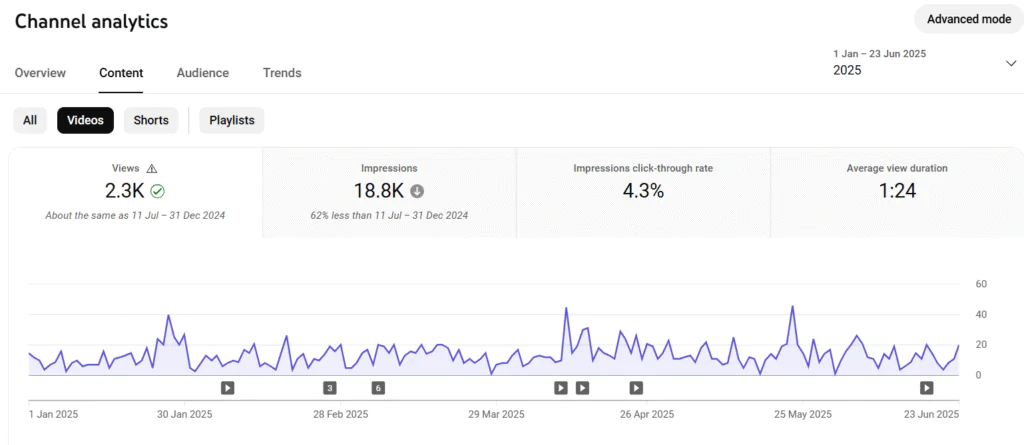
This tab in the analytics tab shows traffic sources, engagement metrics, and what content your audience watches most. You can access this data at the channel level and filter by content type (e.g., videos, Shorts).
Reach:
- Impressions
- Click-through rate
- Traffic sources (search, suggested, playlists, external)
- How viewers find your videos
Engagement:
- Average view duration
- Watch time
- Top videos
- Top remixed
Audience:
- Viewer age and gender
- Viewer interests
- Returning vs. new viewers
Likes, comments & shares
- Head to the Engagement tab to track these social reactions.
- More interactions boost discoverability across the site.
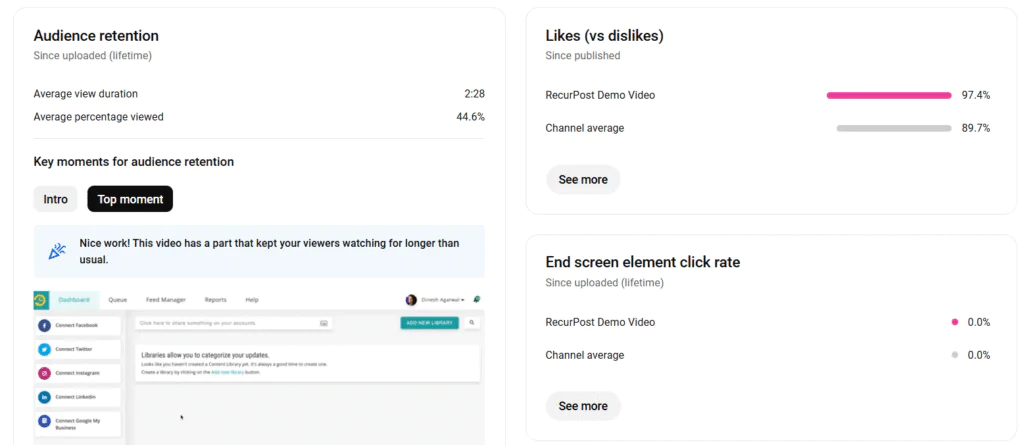
Impressions click-through rate
- In the Reach tab, find Impressions click-through rate (CTR).
- Aim for a 5–10% CTR in your niche to earn more impressions.
3. Audience Tab
Learn more about your audience demographics, like age, gender, and country. See when they’re active and track returning vs. new viewers.
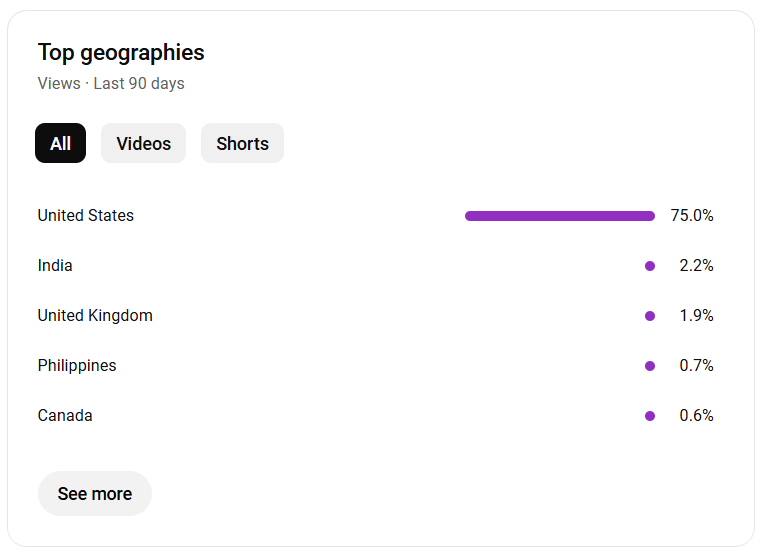
4.1 Demographics & geography
In Advanced mode, apply Demographic → Geography filters to see where your viewers live and what languages they speak.
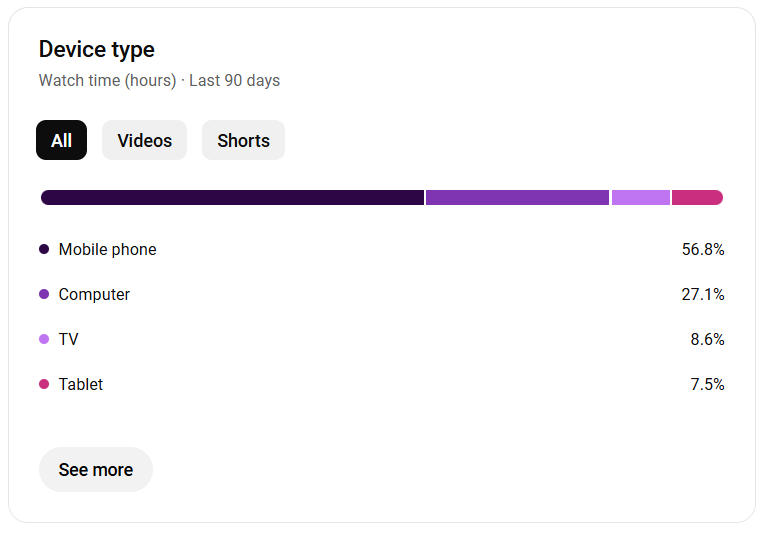
4.2 Device & playback location
- Look for the new Device Type card in Studio (TV, mobile, desktop, tablet).
- Check the Playback location to find out if most views come from the home feed, embedded players, or watch pages.
4. Advanced Mode
Click the Advanced Mode button to filter data by device, location, or time frame and export detailed reports from your channel analytics.
Channel analytics reveal which content gets views and keeps audience engagement metrics strong. Another key part of mastering how to use YouTube Studio with confidence.
Set Up Monetization in YouTube Studio
Monetization features are highly valued by creators using the YouTube Partner Program. YouTube updated its requirements to make eligibility more accessible.
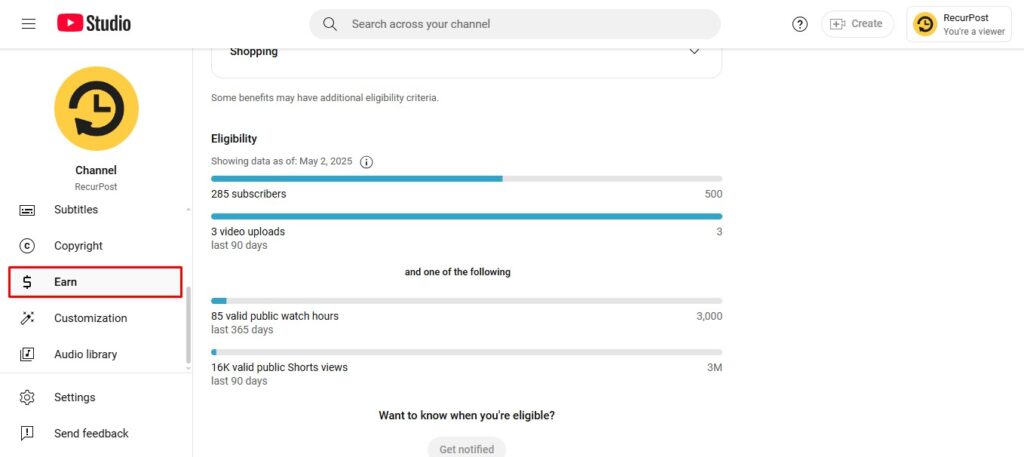
RPM vs. CPM
In the Revenue tab, compare RPM (revenue per thousand impressions) with CPM rates to see true earnings per mille.
Revenue reports
- Identify your top-earning videos and ad formats.
- Use those insights to shape future video ideas and formats.
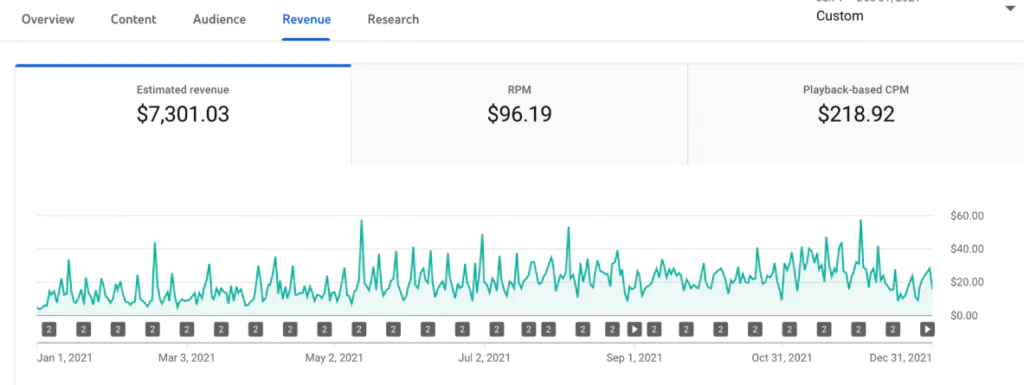
YouTube Monetization Eligibility Requirements
Option 1: Long-form Content
- 500 subscribers
- 3 public uploads in the last 90 days
- 3,000 valid public watch hours in the past 12 months
Option 2: Shorts
- 500 subscribers
- 3 public uploads in the last 90 days
- 3 million valid public Shorts views in the past 90 days
Your channel must also meet these conditions:
- Follow YouTube’s monetization policies
- Be located in a country where the YouTube Partner Program is available
- Link an active AdSense for YouTube account
- Be at least 18 years old or have a guardian handle payments
- Enable 2-Step Verification
- Your channel must follow YouTube Partner Program rules and avoid being marked “made for kids” too often.
Check your monetization eligibility in the monetization tab. This is a big reason many creators want to learn how to use YouTube Studio from the start.
Ways to Earn with YouTube Studio
YouTube’s built-in tools let creators earn through ads, memberships, live stream features, and product sales. You can check the detailed information on how to make money on YouTube for different features. Here’s what’s available:

- Ad Revenue: Earn money from ads shown on your videos and in the Shorts feed. You must be in the YouTube Partner Program to access this.
- YouTube Premium Revenue: Get paid when YouTube Premium users watch your videos. You earn a share of their subscription fee.
- Channel memberships: Give paying viewers access to perks like badges, emojis, and bonus content.
- Super Chat and Super Stickers: Used in live streaming controls, these let fans pay to highlight messages during streams.
- Super Thanks: Viewers can tip your content with a one-time payment on regular videos. They can also leave a message that shows up in the comments.
- YouTube Shopping: Sell your own products or promote brands through product shelves and links in your videos.
- YouTube BrandConnect: This connects creators with brands for paid partnerships. It’s available to eligible U.S.-based creators through an invite.
How to Apply for YouTube Monetization
- Open YouTube Studio: Use the app or go to studio.youtube.com
- Go to the monetization tab: Click the “Earn” option in your YouTube Studio dashboard
- Apply Now: Click “ApClick “Apply Now” to start your YouTube Partner Program application
- Review and Accept Terms: Read the YouTube Partner Program terms and agree to them
- Set Up or Link AdSense: Connect your channel to a new or existing AdSense for YouTube account
- Wait for Review: YouTube will check if your channel meets the rules.
- Monetize Content: Once approved, go to each video and turn on ads under the “Monetization” settings.
Integrate YouTube Studio with Other Tools
Integrating YouTube Studio with other tools saves time and streamlines workflows. While YouTube Studio covers basics, external tools assist with post planning, keyword research, and additional data tracking.
RecurPost: Use RecurPost to schedule posts that match your video uploads. It works with platforms like Facebook, LinkedIn, and Instagram, which helps creators stay active across channels while managing their YouTube videos from one spot. You can also align your posts with what’s going live in your YouTube Studio mobile app or desktop dashboard.
TubeBuddy: TubeBuddy adds tools right inside YouTube Studio. You can find tags, test thumbnails, and update content across many videos. It’s helpful for refining your video title, boosting watch time, and organizing your channel content.
VidIQ: VidIQ works like TubeBuddy and connects directly to your YouTube account. It shows keyword ideas, trending topics, and adds upload checklists inside your editor tab. It’s a good add-on for creators managing playlists, editing video details, and monitoring how content performs.
Wrapping Up
YouTube Studio shows creators’ breakthrough moments through titles generating views, content sharing, and uploads attracting subscribers.
YouTube Studio supports creators through performance monitoring, video editing, comment management, analytics tracking, and content optimization on desktop and mobile platforms, and knowing how to use YouTube Studio makes that journey smoother..
What’s your favorite tool inside YouTube Studio that changed the way you create?
FAQs on How to Use YouTube Studio
1. Can I schedule community posts from YouTube Studio?
No, the YouTube Studio app and web version don’t support scheduling community posts. These need to be posted manually from your YouTube account.
2. Does YouTube Studio show copyright claims in real time?
Yes. When you upload a new YouTube video, YouTube Studio runs checks for copyright claims. You’ll see results on the upload screen before your YouTube video appears on your channel dashboard.
3. Can I manage multiple channels in one YouTube Studio account?
You can switch between channels using the profile picture menu in the top right corner. Each channel has its own dashboard inside YouTube Creator Studio, and you can access YouTube Studio for each by selecting from the drop-down menu.
4. Does YouTube Studio support uploading subtitles in different languages?
Yes. Go to the content tab, select the video, then click edit video details. From there, you can upload subtitle files in multiple languages for your YouTube videos.
5. Can I delete scheduled videos from YouTube Studio?
Yes. Go to the content tab, find the scheduled video, click the three dots next to it, and choose delete. You can also update video details like title, playlists, or monetization settings before it goes live.
6. How do I report a stolen or impersonated handle?
Impersonation can be reported through YouTube’s support page, which flags the account for review under YouTube’s Community Guidelines on identity abuse.
7. How do I check my YouTube verification status?
Before you verify your YouTube account, you might want to check if it’s already verified. Here’s how to quickly check your current status:
1. Sign in to your YouTube account and go to YouTube Studio.
2. Click Settings (gear icon) in the left menu.
3. Select Channel, then click on Feature Eligibility.
4. Look under Intermediate features – if you see green checkmarks next to “Verify phone number,” “Upload videos longer than 15 minutes,” and “Add custom thumbnails,” your account is already verified.
If these features show as available, you can skip the verification steps below. If they’re grayed out or show “Verify phone number” as an option, continue with the verification process.

Ruchi Dhimar is a skilled content writer with 5 years of experience. She is passionate about crafting compelling narratives, specializing in writing content for different industries.

